Composr Supplementary: Finding Your Way Around the Composr Admin Zone
Written by Steve Jarvis, Sponsored by Arvixe hosting
One of Composr's biggest strengths is its large amount of features. However, to a new user the Admin Zone may initially look a little overwhelming. This tutorial is a brief look at the different screens to help you find your way around when you have installed a new Composr website. I'm not going to go into great detail for every single option within the Admin Zone or you will end up reading a 10,000 word essay! This tutorial is to show you where the most common options are.The Dashboard Screen
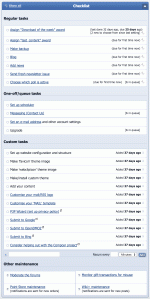
Composr Admin Zone Checklist
When you have a new install like the one in the attached image, there are a number of tasks added for you to work through to get your site ready to go live. Regular tasks on this list include items such as adding news or blog posts, changing the polls and choosing the image of the day. Depending on your site make up some of these may not be used and they can be removed from the list.
You can also add specific tasks to remind you to do certain things and there are a number of custom tasks to help ease you through the process of setting up your site such as submitting your site to Google and adding content to your site. Underneath this section there is a list of all the activity on your site so you can quickly see the most recent interactions and below this section you can add other competitor sites to give you an overview of their site.
In the right hand column, the first item is the status of the software and an update if any new versions have been released. This is followed by any posts in the staff forum if it is being used. The next three items are tips relating to the software which can be left or dismissed, a section to add notes and news relating to the software. The final section is a list of useful links to software and websites which you might need in the process of setting up your website.
The Audit section
The Audit section is probably one you won't use that often for your site, at least in the first stages. This section deals with a range of options from the error log on the site to potential security reports. There is also the information relating to quizzes and your quiz winners if you use it. I'll go into more detail about this section in another tutorial.The Security section
Composr Admin Zone security section
The Setup section
Composr Admin Zone setup section
The first page also includes space to input your site's keywords, header text and description. On this page you can also add your Google analytics ID if you have set this up. The second page gives you the choice to remove a lot of the Composr features which you might not want to use or you can leave them all turned on.
Going through this wizard will save you a lot of configuration time including setting one of three levels of strictness for your site rules when other users sign up. The site rules can also be changed on this process and you will be taken to the theme wizard which we will cover more in another tutorial.
Also in the setup section is the main configuration section where you can change a whole host of options relating to your site from Administrative to Accessibility options. Block options which are the elements of each page (e.g. news blocks, RSS feeds etc) can be configured within this area. There are also Privacy options, Forum options and Security options. Site options within this section covers a lot of things such as opening and closing the site, staff e-mail addresses, SEO related options and notifications.
The last option on this list is the installation options where you can change settings such as database settings. I strongly advise against changing any options in this section unless you are sure of what you are doing as it is possible to completely break your site!
Also under the setup section you can add Custom Comcode tags. Comcode is used for adding and configuring blocks of information on your site. Custom Comcode is often used to make embedding videos from YouTube or Facebook quicker and easier than using the normal embed code (actually that's built into Composr nowadays just by pasting the URL, but you get the point).
The Structure section
Composr Admin Zone structure section
Within the structure section you can configure all of the main sections of your site from zones to panels and pages.
The Structure section also houses the configuration of your forums and chatrooms if you are using these on your site.
The Style section
Composr Admin Zone style section
One part of this section which you will need to use if you are planning to create your own website style is the Themes section. In this sub section you can control all parts of your theme including the templates that make up the site, the CSS, the images and the theme options. Another very useful tool is the theme wizard which you can use to make very quick changes to the basic colour scheme of your site to set the main colour scheme before working on the rest of the theme.
The Tools section
Composr Admin Zone tools section
One part of this section you will likely use more than any other is the members section where you can administrate all of your members details from sending welcome e-mails to adding or editing member details. You can also download a CSV file of all of your members, or import them from elsewhere. This section also has a link to managing your site's usergroups.
The final three things I want to mention are the Website clean-up tools to keep your site running smoothly, links to a wide range of RSS and atom feeds for your site and Commandr which is an in built command line environment.
The Content section
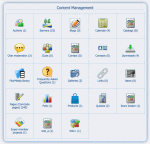
Content Management zone
In this section you also have a link to all of the pages on your site and the ability to add new ones. From here you can control your downloads directory and your file library. For most sites many of these options won't be used, but having all of them in one section makes administering your site very easy.
Help
The last part of the menu is a link to the Documents section of the main Composr website which includes a range of tutorials (like this one!) including basic installation and more advanced tasks. I suggest exploring this section of the Composr site and familiarising yourself with the different sections of your own sites Admin Zone before jumping in at the deep end!Feedback
Please rate this tutorial:
Have a suggestion? Report an issue on the tracker.


