
Composr Supplementary: Creating a Store Locator for Your Composr Website
Written by Steve Jarvis, Sponsored by Arvixe hosting
Adding our Catalogue

(Click to enlarge)
Setting up the catalogue of stores
The first part of this is to set up a catalogue within your install which will include all of the information relating to your stores and the positioning data for each store. To be able to fill in the data you will need to know both the longitude and latitude coordinates of each store. To find this you can use this free website. https://itouchmap.com/latlong.html.I will go through the minimum for creating a new catalogue for your store locator. You can add as many fields to the information as you like but there are too many field option types to cover in this tutorial!
Creating your catalogue
Adding your Store information (filling in a catalogue entry)
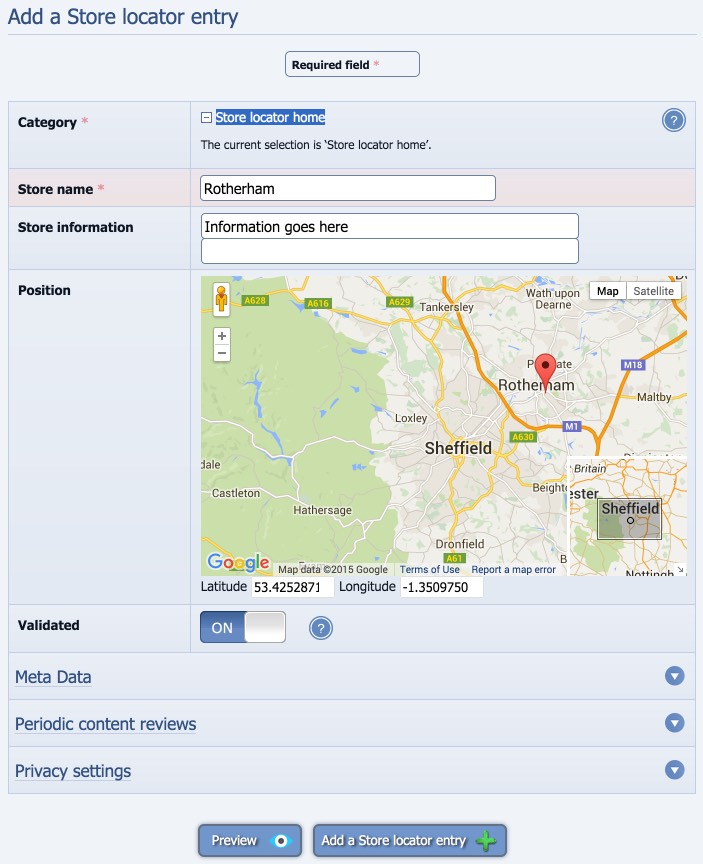
(Click to enlarge)
- Go to the Admin Zone
- Navigate to the Content section of the Admin Zone menu
- Choose the Catalogues icon
- Choose the Add catalogue icon
- Give the catalogue a name – for this version I have called it "stores" and used the same for the catalogue codename.
- In the name box for field 1 call it "Store name"
- Leave the setting as a brief line of text and to display in category views
- On field 2 give it the title "Store information"
- Set field 2 as multiple lines of text either with or without Comcode support. This is so you can fill in the information for the store
- Leave the settings for field 2 as a brief line of text and to display in category views
- For fields 3 and 4 these are the latitude and longitude fields for your stores. They should have one field for "Latitude" and one for "Longitude" and you probably want to untick (uncheck) the options to show on the category-views and also for in search.
- Click the Add catalogue button once you are happy with all of the fields you have added.
Adding the module to your install and placing the store locator on a page
The next part of the process is installing the addon and placing the block on the relevant page. To do this you need to:- Go to the Admin Zone
- Navigate to the Structure section of the Admin Zone menu
- Choose the Addons icon
- Scroll down and choose "Import non-bundled addon(s)"
- Click Download and choose the Information display category
- Choose DataMappr
- Scroll down and click the "Import non-bundled addon(s)" button
- Click Proceed etc until it is installed
Navigate to the page where you want the store locator to appear.
Store locator box

(Click to enlarge)
Code
[block title="store locator" description="This is a Store Locator" latfield="Latitude" longfield="Longitude" catalogue="stores" width="100%" height="400px" zoom="6" latitude=" 53.417436" longitude -1.358185"]main_google_map[/block]
You can change these options to suit your own Catalogue. The parameters you can add are:
- Title – the title of the block
- Description – a description of the block
- Latfield – This is a required field and must have the same name as the field you have put the latitude coordinates in when creating the catalogue
- Longfield – This is a required field and must have the same name as the field you have put the longitude coordinates in when creating the catalogue
- Catalogue – A required field and should be the codename of the catalogue you have created
- Width – the width of the block, This will default to 100%
- Height – the height of the box which will default to 300px
- Zoom – A number between 1 and 17, the higher the number the more zoomed in the map will start at.
- Latitude – The Latitude coordinates where you want the center of the map to be when first loaded.
- Longitude – The Longitude coordinates where you want the center of the map to be when first loaded.
Feedback
Please rate this tutorial:

Have a suggestion? Report an issue on the tracker.