
Composr Tutorial: Composr member system
This tutorial explains aspects of the Conversr member system.
Default accounts after installation
During installing Composr, there will be two usernames provided by default:- admin (or whatever you changed it to during installation)
- test
The test username is intended for testing permissions for non-administrators, which is a very important task, as it is easy to make mistakes during configuration.
Information about testing permissions is available in the Access control and privileges tutorial ("Testing access and privileges").
Usernames and display names
Composr supports both usernames and display names. By default they are the same thing, but there's a "Display name generator" option that lets you generate display names from custom profile fields (such as by combining the first name and last name).Display names are useful for large social-networking style sites, where you want normal human names, but can't rely on those being unique.
Joining
There are a number of ways a member might join an Conversr website. Note that on non-Conversr websites it is the responsibility of the third-party forum to handle the joining (aka registration) process.Regular mechanism
Joining a Composr powered site
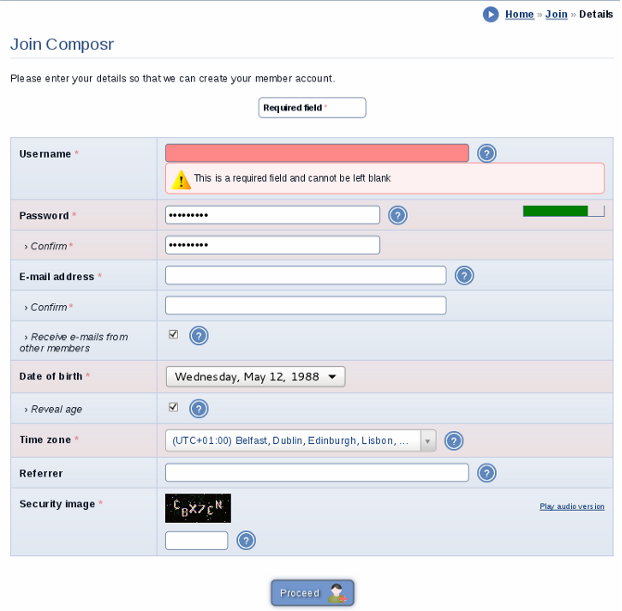
(Click to enlarge)
To join, users will have to agree to your rules, which are actually the same as those defined in your :_rules Comcode page. In other words, to edit your rules, you need to edit this page. Once the rules are agreed to, they get a form to fill in with various details; for information on how to require additional details at joining, see the Advanced Composr member system tutorial.
The form includes, if enabled in the configuration, a security image (CAPTCHA ) that they must enter a numeric code from. There is also an audio equivalent to the image. Users with special needs might have difficulty with CAPTCHA: therefore you may, on occasion, need to add a member manually from the Admin Zone, and give them the details personally. The purpose of CAPTCHA is to prevent 'bots' (computer programs usually designed to wreak some form of havoc) from joining your site and abusing it.
There are a number of constraints on how fields may be filled in, and some of these are configurable from the main Admin Zone Configuration. For example, special characters are not allowed in usernames, and by default, any e-mail address may only be used for one account.
Once the form is filled in successfully, an e-mail will be sent to the given e-mail address containing a link to activate the account (assuming the "Confirmation of member e-mail addresses" option has not been disabled). The purpose of this is to ensure that they are giving a real working e-mail address, and hence are contactable. If the e-mail never arrives for any joining user, the most likely situation is a fault with e-mail sending on the server: it is essential that Composr is connected to a working e-mail server, either by directly residing on it, or by setting up SMTP settings in the main Admin Zone Configuration (see the Understanding and configuring e-mail tutorial). Joining users must be patient for a few minutes, as e-mails can sometimes take a while to arrive.
The login block (which turns into a 'personal stats' block after logging in)

(Click to enlarge)
The detailed logging in page

(Click to enlarge)
If a member has forgotten their password, there is a link to have it reset available from the full login page (available by clicking 'Options' in the login block); this will send an e-mail to the address of the account that provides a link that when clicked, causes Composr to send out a new password by e-mail. This reset sequence is designed to reduce the risk of abuse.
Recommendation and Invites
Sending out a recommendation
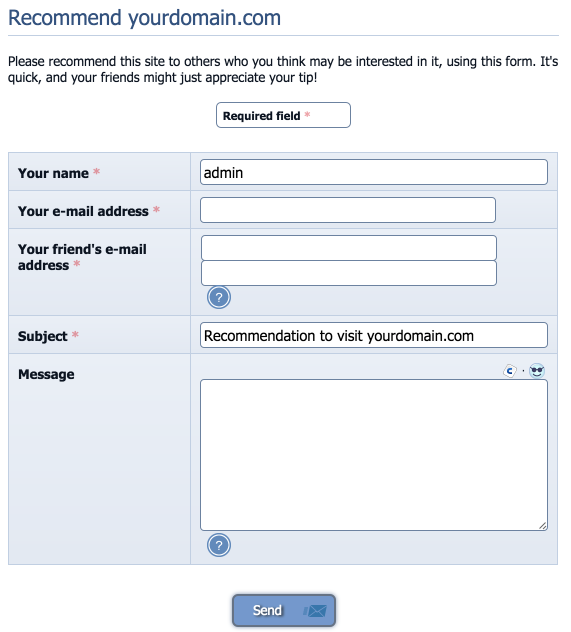
(Click to enlarge)
- General recommendation, sending out e-mails from people recommending your website
- Invites, if joining is restricted
General recommendation is very straight-forward. Composr provides the ability to upload contact lists, from various e-mail software, so you can recommend to many people at once. Members may customise the message sent out when their recommendation is made.
Invites
If you enable invites (the "Invites enabled" option), new members may only join if they have received an invite by an existing member.You can enable "Invites" in the configuration (the "Invites enabled" option) if you do not want members to be able to join in the usual way, and instead only allow them to join if they receive an invitation from an existing member.
This process works as follows:
- An existing member goes to the recommend module to refer another member to the website (make sure you put a link to this somewhere on your menus so they can find it).
- That member will choose to make the recommendation as an invite.
- That member will put in the e-mail address of the person being invited.
- Composr will send out an invitation e-mail.
- The person being invited will be given a link to join and instructed to input the e-mail address they were invited to. An invite will only work if the invited user signs up using the exact same e-mail address that an invitation was sent to.
- Assuming the person inputted the invited e-mail address, the invite will be successful.
Members have a limited number of invites to use, determined by the "Invites per-day" option. Other than this, there are no controls or restrictions on invitation – it is fully automated.
There is no direct way to request an invitation. Someone must know someone who is already a member to get one. If admins wish to hand out invitations, they have unlimited to give. Of course, admins may also set up new members manually. Invitation-request could therefore be implemented manually, via a contact form.
Pre-joining members (manually adding members)
Adding members manually in the Admin Zone, highlighting how we can set the initial usergroup
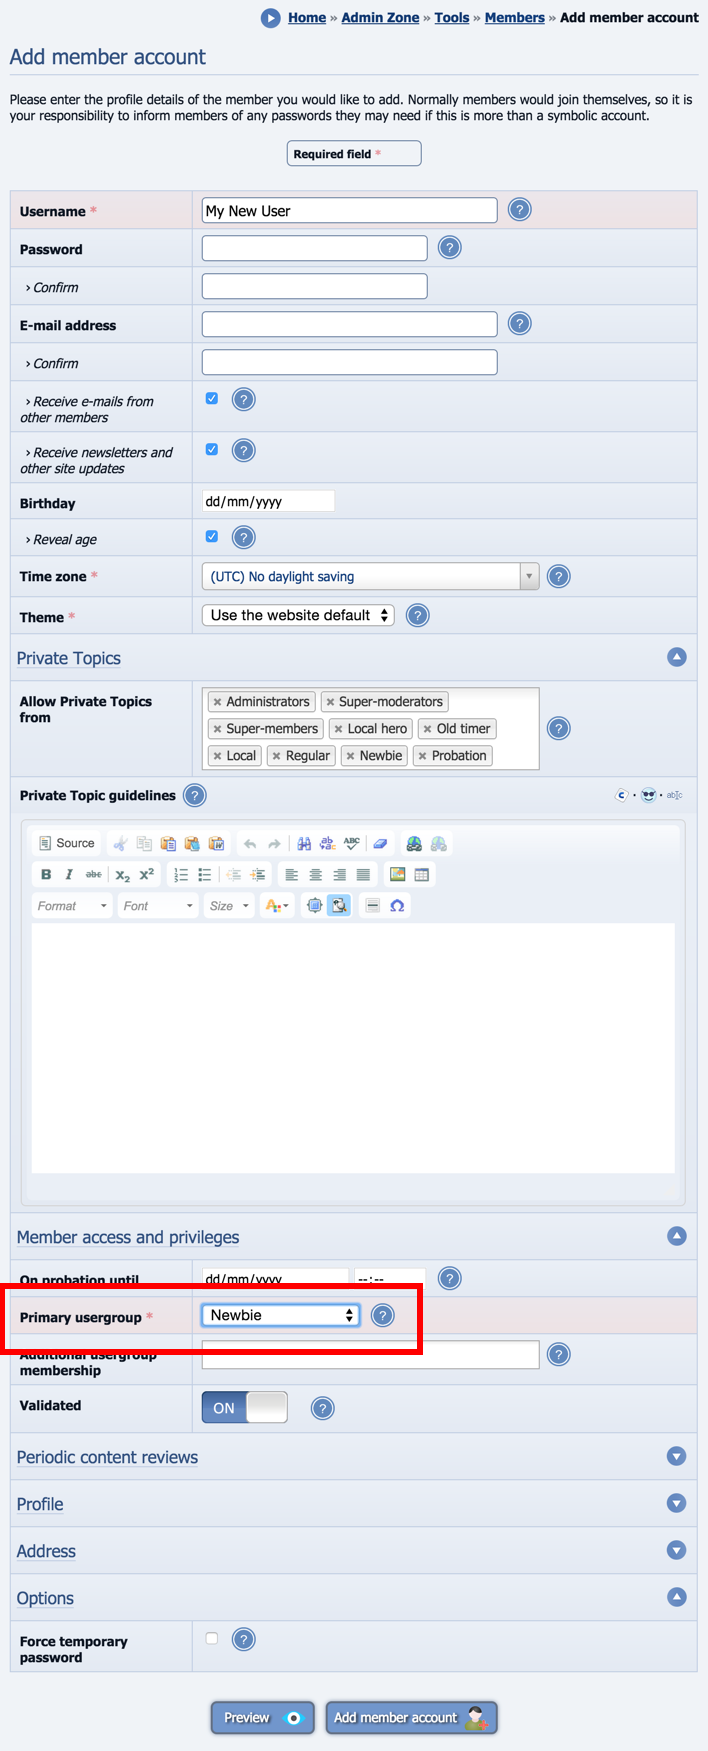
(Click to enlarge)
A screen is provided (Admin Zone > Tools > Members > Add member account) to add a new member to the site, with support for detailing the full set of profile options, including ones not available normally during joining, and ones not available for members to set themselves.
The most common situations where it is convenient to pre-join a member are:
- if you want to add a member to the site before directing them to it, so that you don't have to make them go through the process themselves, or so that you can properly control or quickly set all their details, such as username and usergroup.
- if you want to add a member to the site before directing them to it, so that you can assign things to them before they reach the site (such as points).
- if the member encountered a problem during the joining process, possibly due to a difficulty with the image confirmation code (some Internet service providers do not properly assign IP addresses to users that are stable for any significant length of time, such as AOL: this can cause problems with the storage and later retrieval/processing of the image confirmation code)
Other kinds of membership
Composr can also support automatic member joining via LDAP and http-auth. For more information on these mechanisms see the links at the bottom of this page.Log in
Log in is normally done by username.However, if the "Restrict to one member per e-mail address" option is not set to "No" then members will be able to log in with e-mail address also (because Composr knows that this will be a unique key for the user also).
Profiles
The member directory, where profiles may be accessed from
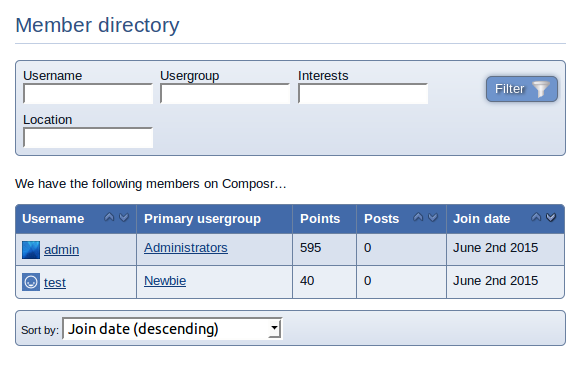
(Click to enlarge)
An alternative way to view a member profile is to select/search using the member directory.
The directory is provided by the members module (site:members page-link, Social > Member directory on the default menus).
Member profiles contain information on the member, including:
- Statistics: Posts, Points, last submission time, and most active forum
- Their photo
- Their time
- Their online status
- Custom profile fields
- Their IP address when they joined (only viewable by those with privileges)
- Their date of birth
- Whether they are banned
- Their join date
- Their primary usergroup
- The most recent web browser they have used (only viewable by those with privileges, and only if the stats addon is installed with data having been collected)
Viewing a member profile
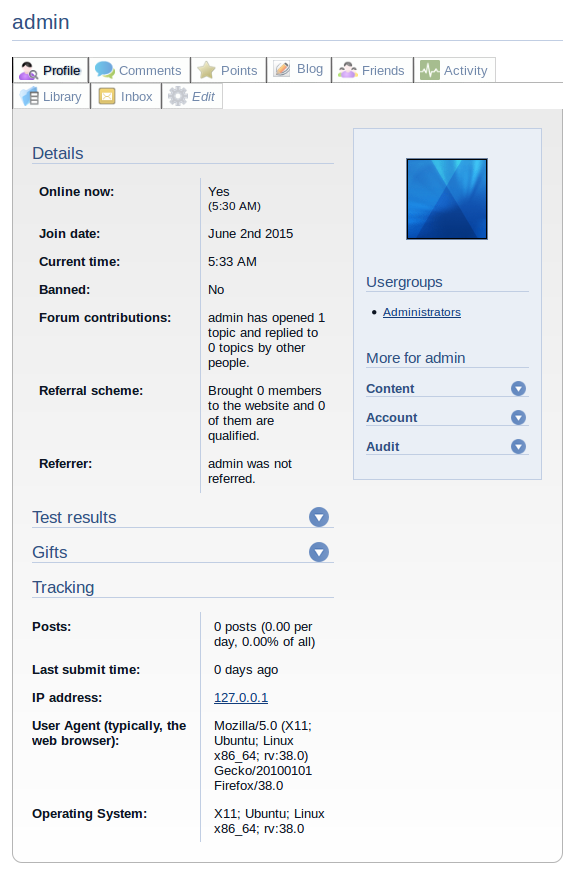
(Click to enlarge)
Links include:
- Member blog and blog archive, if they have a blog
- Personal galleries the member has
- E-mailing them, if they allow it
- Points profile
- Starting a Private Topic
- Author profile
- Authored/submitted search
- Warning creation
- Post history
- Investigation
- Account
- Personal Calendar view
- Edit links for account features
- Buildr profile, if the Buildr addon is installed and they have used it
Member observation
Viewing the list of online members
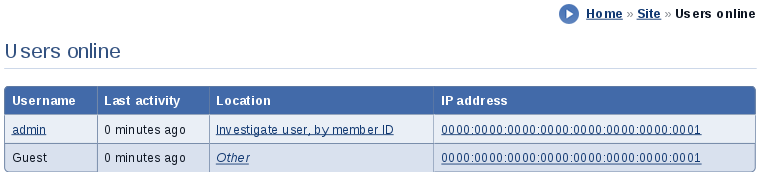
(Click to enlarge)
Online members are shown at the bottom of social screens, via the default placement of the main_bottom_bar block.
You can also go directly to the users_online module (site:users_online page-link, Social > Users online on the default menus).
There is also a side block you can use, side_users_online that shows:
- a list of online users
- how many guests are online
- the newest member
- member birthdays (unless the "Enable birthdays" option is disabled)
Member birthdays are also shown on forum-view screens. Note that birthdays for members who have chosen to reveal their age will include the display of their age.
Editing the Account
Editing your/a member profile
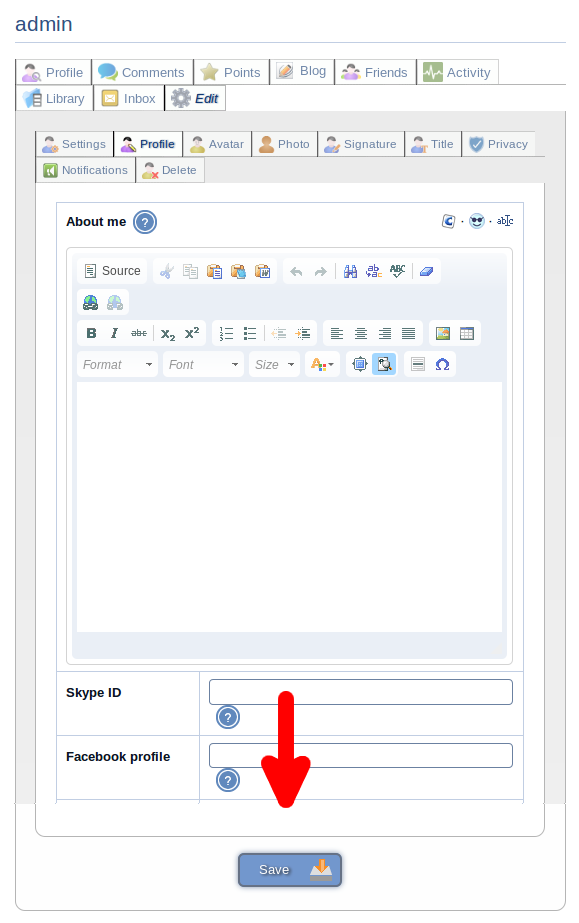
(Click to enlarge)
Of course a member can only edit their account, unless they have special privileges to edit the accounts of others.
Edit profile
Profile settings, mainly custom profile fields, may be edited on the edit profile sub-tab.Edit settings
The 'edit settings' sub-tab allows you to edit most details associated with an account, including options and what would literally be called 'profile'.Staff see much more to edit than ordinary members, including all the hidden custom fields that Composr uses to keep track of point and staff details.
When editing the default accounts, you will need to specify e-mail addresses before it will allow you to complete the edit. The reason for this is that e-mail addresses are basically required for all accounts, but could not be provided by the installer.
Interesting editable fields for profiles include:
- changing the account password. If the password fields are left blank, the password is not changed
- changing primary usergroup. Obviously the member can not do this themselves
- (un)validating the account. There is an option for staff to require in the 'Forum options' of the main Admin Zone Configuration to set new members as non-validated upon joining, so as to require staff validation before they may login; this can be used to perform this validation, or reverse it
- banning of the member. Note that Composr will not let you ban yourself, for obvious reasons
Edit signature
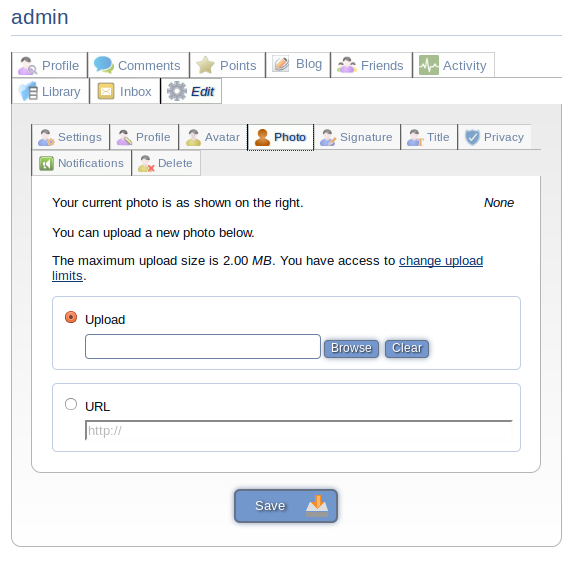
Editing your/a member photo
(Click to enlarge)
Editing your/a member signature
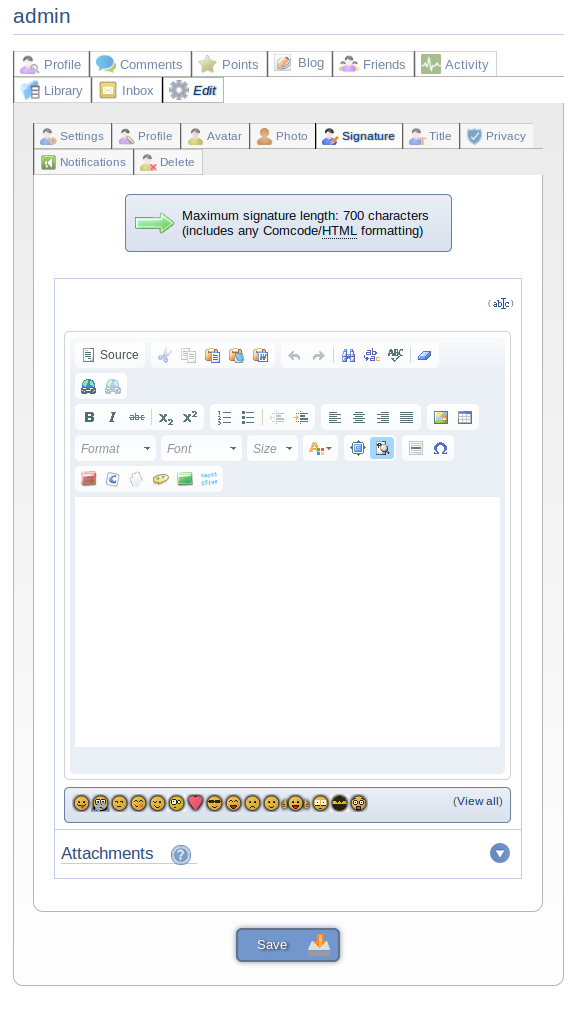
(Click to enlarge)
- their name
- a personal banner
- quotes
- a link to a personal website
- background information on themselves
Edit photo
Members may choose a photo of themselves (or staff can) for display in their profile.There is a privilege to specify whether members may view the photos of other members, as there is an obvious 'stalking'/'paedophile' issue that must be considered for forums with young members.
It is common for websites to impose restrictions and rules with regard to signatures, as long or complex can be an annoying distraction from the flow of reading forum posts, and a 'bandwidth hog'. Members may decide not to view other members' signatures by editing their profile to preclude their display.
Edit avatar
Editing your/a member avatar
(Click to enlarge)
Composr provides two sets of default avatars for inartistic/uninspired members to choose from (or possibly, if they just love our default avatars!). However, members may also upload their own avatars, or link to an avatar elsewhere.
If there is a theme image with the name cns_default_avatars/default then this will be used as the default avatar a member gets when the join, otherwise default avatars will be picked randomly.
Avatar size is limited by the maximum size determined by any of their usergroups. 80×80 pixels is the size Composr uses by default.
If you don't want the avatar feature (many modern sites prefer to keep just photos), you can uninstall the cns_member_avatars addon. This will make member photos show where avatars normally would. Don't get confused with addon naming – cns_avatars contains default avatar choices, but cns_member_avatars contains the functionality itself. If you just remove cns_avatars you'll probably end up with users with broken avatar images.
Adding avatars
Our default avatars may not be appropriate for some sites, but you may add or remove them.This can be done in two ways:
- Using the Admin Zone, the theme image editing screen
- Manually managing files, FTP / Hosting File manager
To actual get rid of the existing default avatars you will need to remove the addons that they are bundled with:
- cns_avatars
- cns_cartoon_avatars
- cns_thematic_avatars
There are two ways to create a new avatars. Avatars are just theme images in Composr, stored in a particular folder. We typically add them to the default theme so that all themes can have them (automatic inheritance).
Using the theme image editing screen (slow, tedious - but no extra tools needed)
- Go to Admin Zone > Style > Themes > Edit Theme Images (on the default theme)
- Click the "Add Theme Image" button (at the bottom)
- In the "Codename" field, put cns_default_avatars/new_set/example (substituting "new_set" with the name for your set, and "example" with the name of the avatar, usually the filename without the file extension, e.g. "example.png" would be "example").
- Browse for the "Image" file to upload.
- Click the "Add theme image" button.
Using FTP / Hosting File manager (quick)
- Log in to FTP / your Hosting File manager
- Browse to themes/default/images_custom
- Create an cns_default_avatars folder if it doesn't already exist
- Go into the above folder
- Create a folder with the name of your new avatar set. Only use alphanumeric characters, no spaces.
- Go into the above folder
- Upload all your avatar image files to here. Use filenames with alphanumeric characters, no spaces.
That's it, the new avatar set will be visible immediately.
Default avatars
You have 3 options when it comes to assigning default avatars to members.- Design solution. In any template that uses an avatar, put in code to display a theme image of your choice when there is no avatar to display. I don't really recommend this unless you are very comfortable doing lots of template editing.
- Configured default. You can add a default. Add a cns_default_avatars/default theme image.
- Randomisation solution. There is a configuration option, "Assign random avatars", that you can enable.
Edit title
Editing your/a member title
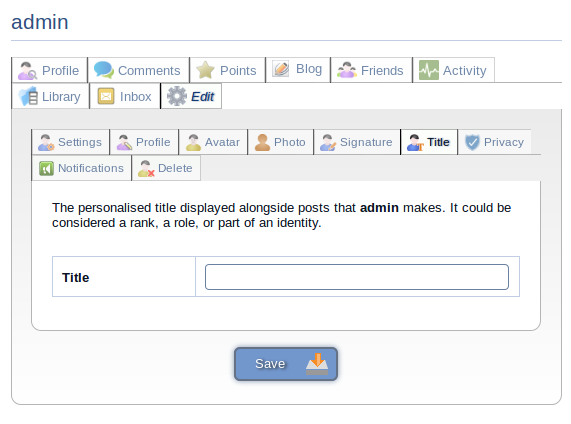
(Click to enlarge)
Titles are displayed alongside forum posts, in the section that is accessed by 'hovering over' their username.
Deleting a member
If members are in a usergroup with the 'Delete own member account' privilege, they may delete themselves. This is provided for those members concerned about privacy or spam, who prefer not to leave old accounts around. You may choose to disallow privileges because often members will quickly return after 'getting over' some 'event' that caused them to 'leave', and cause administrative trouble when they start demanding control over their old content, as well as their old points.If an account needs deleting due to duplication, there's a merge feature (Admin Zone > Tools > Members > Merge members) to merge accounts which you may wish to use instead. That feature will reassign content from one account to the other.
There is also an admin feature that allows you to delete 'lurkers' (the definition of lurker is up to you, as the feature is quite flexible). You can access this feature from Admin Zone > Tools > Delete Lurkers.
If an admin account is deleted you may wish to add that account's username to the "Restricted usernames" option to prevent someone else re-registering the username.
Privacy
Privacy allows you to specify what custom profile fields will be visible to whom. It is controlled via the "Member privacy controls" option.If the "Extended privacy option control" option is enabled then it can be set in low-level detail. Otherwise it works via simple access levels for each field.
Usergroups
Usergroups (and clubs) are covered in the Tools for subsites and subcommunities tutorial.Last visit dates
The forum shows the viewing user's last visit and the number of topics/posts since that last visit. Logging in/out triggers a new visit to count (also reopening the browser would).It works as follows:
Essentially member profiles contain a last request date (in the database), which is maintained as you browse through the site. If you login, or open the browser, it copies that into a cookie that's value persists until you login again or reopen the browser. The cookie is the reference point which is used as the last visit date.
Concepts
- Profile
- Member profiles define details, including options, relating to members
- Account
- The zone that a member manages and accesses settings and content related to themselves
- Avatar
- A pictorial representation of self
- Usergroup
- usergroups allow common representation of properties (especially permissions) relating to a group of users in similar situations.
See also
- Advanced Composr member system
- Access control and privileges
- Legal and social issues
- Correspondence between users
- Tools for subsites and subcommunities
- People in their roles
- Using IP addresses to trace users
- Policing a community site
- Integrating Composr into a corporate network via LDAP
- Integrating Composr into a network via HTTP authentication
- Notifications
- Anti-spam settings
Feedback
Have a suggestion? Report an issue on the tracker.