
Composr Tutorial: Analytics and split testing – using Google Analytics
Written by Rajesh Kumar (ocProducts)
The objective of this tutorial is to provide brief information about Google Analytics and guidance on configuring Google Analytics through Composr. We provide basic setup instructions, as well as some scenarios and guidance touching on advanced usage. We only really scratch the surface, but our aim is to provide you introductory information as directly applied to Composr – a foundation for applying all standard Google Analytics techniques described in third-party guides.Some alternatives to Google Analytics are also discussed at the end of the tutorial, for those who prefer non-Google solutions.
Table of contents
-
Composr Tutorial: Analytics and split testing – using Google Analytics
- Why bother with analytics?
- Introduction to Google analytics
- Goals and split tests: worked example
- Suggestions for split tests
- Creating events (advanced)
- Alternatives to Google Analytics
- See also
Why bother with analytics?
Statistical measurement is an important technique for evaluating the activities of a website. It will help you understand the effectiveness and performance of your website investment. The information gathered is both interesting and useful to understand which pages are popular among visitors and which pages may require redesign or content improvements. Analytics is a great approach to improving the effectiveness of any website.Introduction to Google analytics
Google Analytics is a free web based tool offered by Google that generates detailed statistics about website visitors. The tool will provide information on how the visitors found the website through tracking all referring sources such as search engines, pay-per-click, redirects, banner advertisements, e-mail links, and any other channels you have. The tool will also gather and provide details of visitor's behaviour like which pages they have visited, the time spent on each page, and where the visitor exits the site.Further, Google Analytics is a very capable "enterprise-class" web analytics solution. It provides rich insights into your website traffic and marketing effectiveness. Powerful and flexible features let you see and analyse your traffic data in-depth. With advanced use of Google Analytics, you're more prepared to write better-targeted ads, strengthen your marketing initiatives and create higher converting websites.
Google Analytics allows you to:
- Monitor advertising ROI
- Monitor cross channel and multimedia tracking
- Create customised reporting
- Monitor sharing and communicating
- Visualise your data
- Monitor a number of metrics such as visitor location, and upstream and downstream traffic
The following are common items gathered by Google Analytics:
- Where the visitors are from
- How the visitors found your website
- Keywords used to find your website
- Web browsers used by visitors
In addition to the above list, for larger websites built around a CMS the following gathered items are very important:
- Users' reaction on various different pages
- Guests getting converted to members (i.e. joins)
- Other measured goals such as newsletter signups
You can sign up for Google Analytics here. If you already have a Google account you can sign in, otherwise you can create a new account. In order to really explore the product it is advisable to sign up with your active website details. Upon signup a Google Analytics tracking code will be generated for your website.
Google Analytics terminology
There are three key terms in Google Analytics which you need to be familiar with in order to set up analytical report conditions. They are:- Events
- Goals
- Content experiments
Events
Google Analytics Events tracking is the method for identifying/tracking events of user interactions with pages in a website. Actions such as ad clicks, video plays, and downloads, can be tracked by calling the Google script code from the appropriate part of a template/Comcode page. The inputs gathered by events will be used to build up reports within Google Analytics.We actually won't be using events in the main scenario of this tutorial, but we will cover them further down.
Goals
Google Analytics Goals are predefined or user-defined conditions to measure data based on the actions visitors take. Goals are defined within Google Analytics to gather information such as how many visitors spend a minimum amount of time on a website, visit more than a minimum number of pages, sign up to a newsletter, download a file, or make an eCommerce transaction.Goals once created cannot be deleted but you can switch off any particular goal that is not required.
Content experiments
Google Analytics Content experiments (or just experiments) allow you to set up multivariate testing . Unlike generic A/B testing, in content experiments Google allows the user to test up to 10 variation pages from an original page (i.e. true multivariate testing).For the purpose of this tutorial we will only consider A/B testing, i.e. 1 original version & 1 variation. This is quicker to set up and easier to interpret.
We will use the casual term split testing from now on in the tutorial.
The terms can be a bit confusing, so the concepts table at the bottom summarises them all.
Goals and split tests: worked example
Google Analytics implementation
We will define an example scenario, which we will provide instructions against.To come up with a scenario we first need to decide the required goals for a website. You need to decide what goals are most appropriate to your website content/functionality.
Let us make our example that of a political website. Among many interesting goals for this website would be tracking donations made by visitors. The goal can be implemented by tracking when visitors get to a "thank you" page, that only is shown after a donation is made.
The URLs used will be for our old product name, ocPortal (ocportal.com), but for this example just pretend that's a political site.
Now let's proceed to set this up in Google Analytics. Follows is a walkthrough on setting up the Goal and Content experiment.
Creating our goal
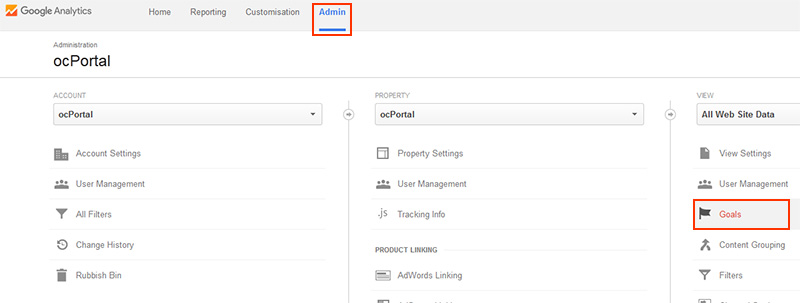
Let us create our two goal. Here's how:- Log in to Google Analytics
- Click "Admin" from the menu options (on the top right)
- A three column menu will be shown on the page
- Under the menu you can find "Goals", click that:
- Click on the "NEW GOAL" button
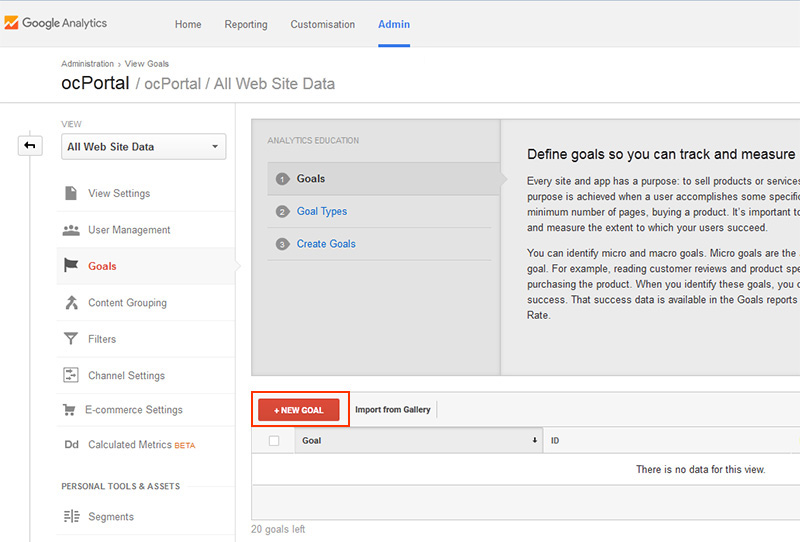
- We will choose a "Custom" goal, then click "Continue"
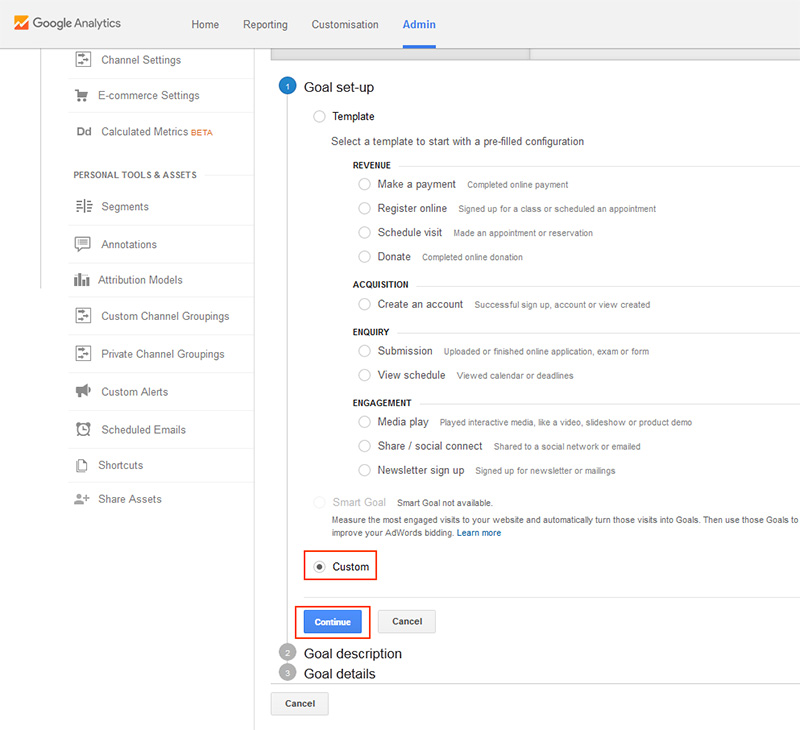
- Under the "Goal description" section you will be prompted to provide a name for the goal and goal type. We'll be doing for a "Destination", which we'll type in later

- Click "Continue", which leads to "Goal details"
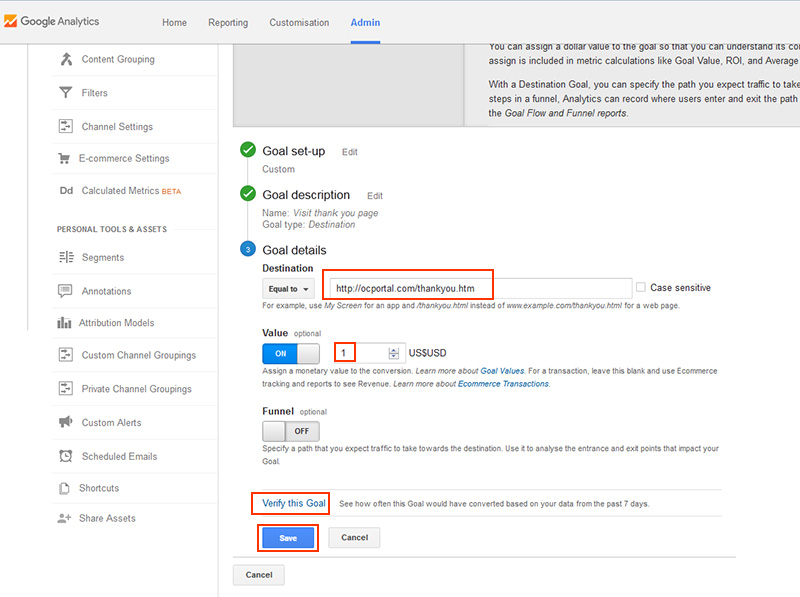
- At the "Goal details" section you can provide the URL to where the goal is considered reached. In our case we will make it a page, thankyou. We'll put in thankyou.htm, which is assuming we have the "Use .htm to identify CMS pages" URL scheme configured in Composr
- The "Value" field is optional. Users sometimes assign "1" for statistical analysis purpose once the report is generated
- Click the "Save" button, taking you to a page listing your new goal

Creating our content experiment
We will make a content experiment that sees how different page versions affect the analytics for reaching our goal. The response trends (effectiveness) can be evaluated analysis within Google Analytics.- Log into Google Analytics
- Click "Reporting" from menu options listed on top right side
- This will open a menu list panel on the left side of the screen
- Scroll down to see "Behavior" as first level menu entry (which usually appears after "Acquisition")
- Click "Behavior" to expand sub-menus, where you can find "Experiments"
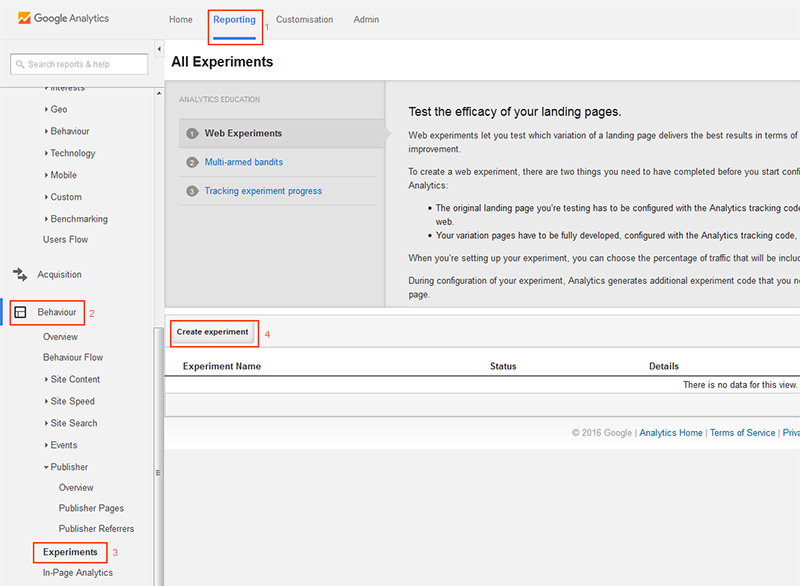
- Click "Experiments" to get a new page in the main panel
- Click on "Create experiment".
- In the new page provide your inputs for the split testing scenario.
- Fill up the options and. Smart tips are there if you need help to understand particular fields. We will be associating with the goal we created earlier.
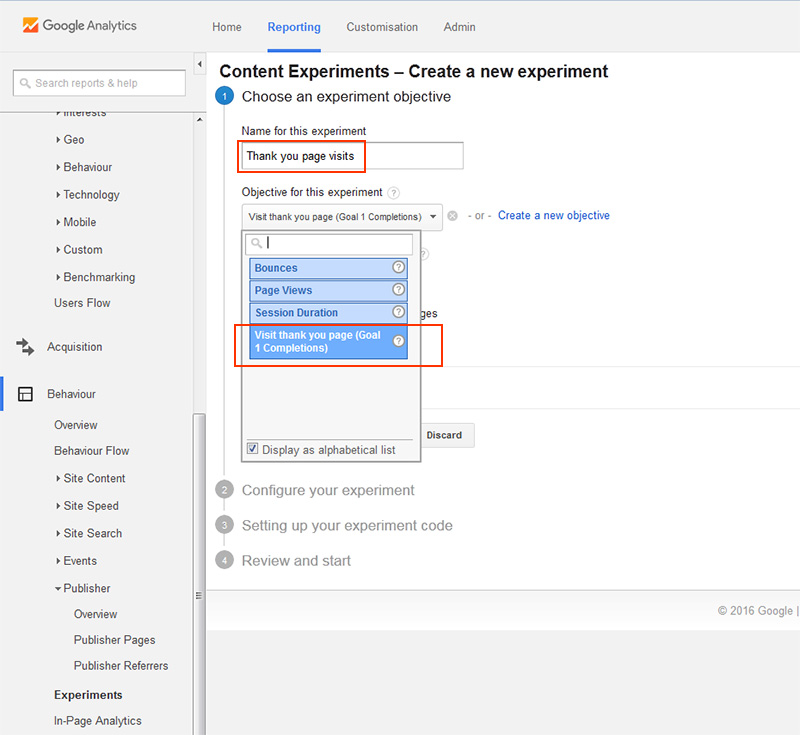
- Click on "Next Step"
- In the next page you can configure your original page by providing the URL of the original page in the first field and its name in the next field.
Next, to configure your variate, provide the URL of the variate page along with its name.
We will differentiate between these different versions using a 'version' URL parameter, as indicated in the screenshot. If no version is specified, we will consider this the same as 'version=1', which will let us omit it from the original URL (we don't want to change/pollute our original URL anyway).
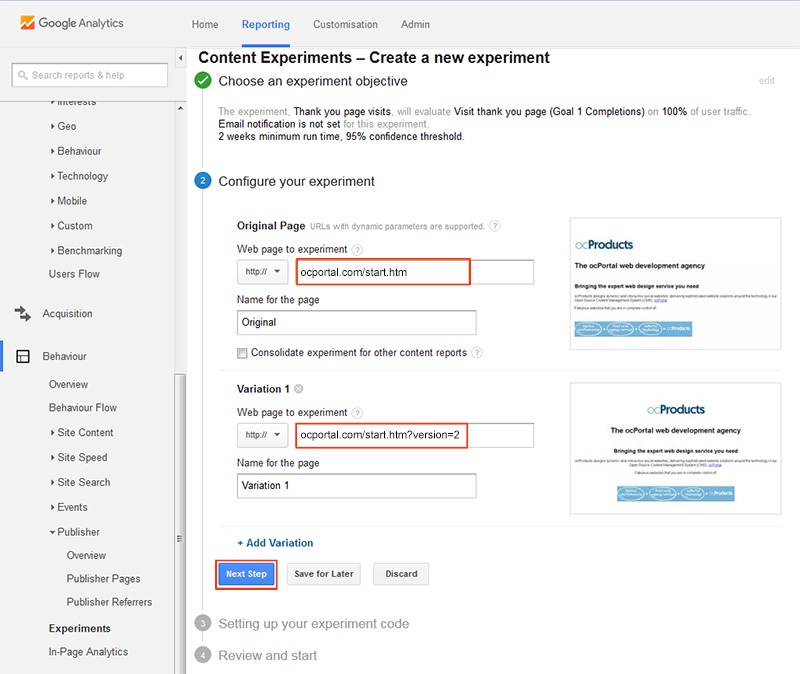
Google will use the URLs of the original and variate page to perform the split testing. - Once you confirm by clicking "Next Step", the tool will prepare experiments code and provides you the option either to "Manually insert the code" or "Send code to webmaster".
Grab the experiments code and save it in a temporary file somewhere.
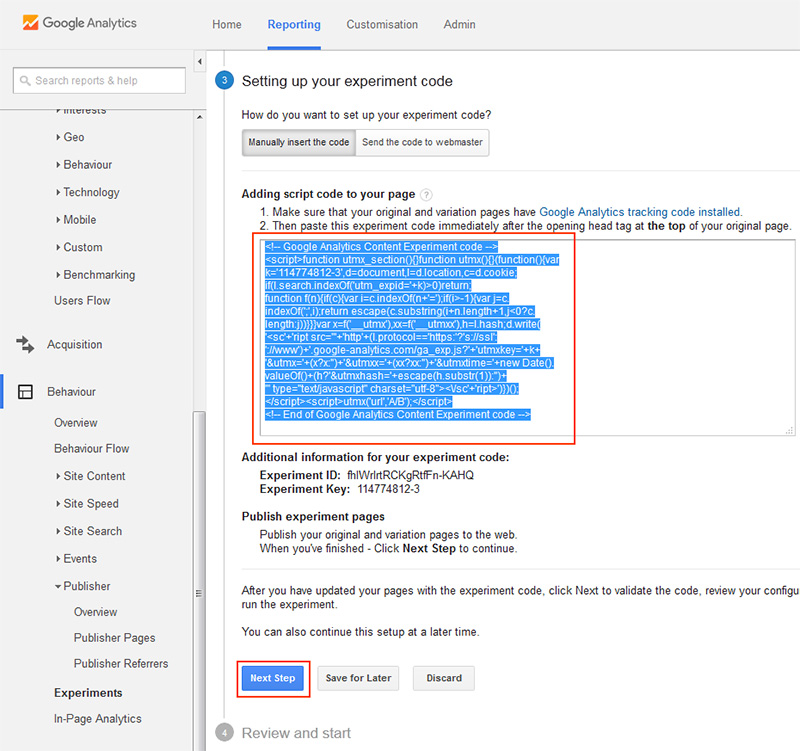
Later we will put this code for the original version of the page for which we're doing the split testing – this will be covered under the "Configuring Google Analytics split testing within Composr" section.
We will come back to Google Analytics, after configuring the Composr site (the "Starting the split test" section).
Configuring the Google Analytics Tracking ID in Composr
To include the Google Analytics tracking ID you just need to set a config option within Composr. It's super-easy, because Google Analytics is pre-integrated.Do the following:
- Go to Admin Zone > Setup > Configuration > Site options
- Click on the "General" link shown under the Contents section
- Scroll to find "Google Analytics Web Property ID"
- Make sure "Store full Google Analytics cookies" is ticked (checked), to enable cookies (without this tracking may not work correctly)
- Click "Save"
Configuring Google Analytics split testing within Composr
To configure through Composr, take the auto-generated experiments script code from earlier.It is required to paste this script immediately after opening <head> tag. We have to edit the head template in Composr. Developers familiar with Composr can directly edit the template file directly and non-developers users can edit the template via the Admin Zone.
In either case we also need to surround it with some extra code:
Code
{+START,IF,{$AND,{$MATCH_KEY_MATCH,:start},{$EQ,{$_GET,version,1},1}}
... (original code goes here) ...
{+END}
This extra code contextualises it to just the page we want it on, as we will be putting it into a shared template.
For developers
- Go to the themes/default folder and copy HTML_HEAD.tpl into templates_custom (if it is not already there)
- Edit themes/default/templates_custom/HTML_HEAD.tpl, pasting the contextualised code after the opening <head> tag
For non-developers
- Go to Admin Zone > Style > Themes
- Click on the "Edit templates" option available for the used theme
- Select HTML_HEAD.tpl from existing template list
- Click on the "Choose" button after selecting the template file
- The template file will be opened in an editor
- Paste the contextualised code immediately after the opening <head> tag
- Click "Save"
Generating our variant within Composr
We still need to serve users either the original or the variant somehow (our two "versions").Recall we used http://ocportal.com/start.htm as original URL and http://ocportal.com/start.htm?version=2 as the variate URL.
In Composr, these two versions can be configured in a single Comcode page, start. You can use Tempcode to create the two scenarios in the file.
Here is an example of a page:
Code
			[semihtml]
{+START,IF,{$EQ,{$_GET,version,1},1}}
   [staff_note]Shown for http://ocportal.com/start.htm or http://ocportal.com/start.htm?version=1[/staff_note]

   <p>We'd like you to make a donation:</p>
   <form action="https://www.paypal.com/cgi-bin/webscr" method="post">
      <input type="hidden" name="business" value="payment@ocportal.com" />
      <input type="hidden" name="cmd" value="_donations" />
      <input type="hidden" name="item_name" value="ocPortal friend" />
      <input type="hidden" name="item_number" value="Website donation" />
      <input type="hidden" name="currency_code" value="USD" />
      <input type="hidden" name="return" value="http://ocportal.com/thankyou.htm" />

      <input type="image" name="submit" border="0" src="https://www.paypalobjects.com/en_US/i/btn/btn_donate_LG.gif" alt="PayPal - The safer, easier way to pay online" />
      <img alt="" border="0" width="1" height="1" src="https://www.paypalobjects.com/en_US/i/scr/pixel.gif" />
   </form>
{+END}

{+START,IF,{$EQ,{$_GET,version,1},2}}
   [staff_note]Shown for http://ocportal.com/start.htm?version=2[/staff_note]

   <p>Donations help pay for our political campaign. Maybe you could help us out with a donation?</p>

   <form action="https://www.paypal.com/cgi-bin/webscr" method="post">
      <input type="hidden" name="business" value="payment@ocportal.com" />
      <input type="hidden" name="cmd" value="_donations" />
      <input type="hidden" name="item_name" value="ocPortal friend" />
      <input type="hidden" name="item_number" value="Website donation" />
      <input type="hidden" name="currency_code" value="USD" />
      <input type="hidden" name="return" value="http://ocportal.com/thankyou.htm" />

      <input type="image" name="submit" border="0" src="https://www.paypalobjects.com/en_US/i/btn/btn_donate_LG.gif" alt="PayPal - The safer, easier way to pay online" />
      <img alt="" border="0" width="1" height="1" src="https://www.paypalobjects.com/en_US/i/scr/pixel.gif" />
   </form>
{+END}
[/semihtml]
These scenarios present PayPal donation buttons, with slightly different text. Perhaps the second will perform better, but only split testing will show us for sure.
{$_GET,version,1} means "retrieve the version URL parameter, and if it is not set then return a default of 1 for us" (i.e. the default is version=1).
You'll need to create the thankyou page also. There are no special instructions, it will just be a regular page.
Generating very small variations
Here is a more compact way to do quick inline variations within Tempcode/Comcode:Code
{+START,CASES,{$_GET,version,1}}
1=This is shown in random case 1.
2=This is shown in random case 2.
{+END}
Generating links to our versions
Composr now picks the scenario automatically based on the URL shown to the user (the 'version' parameter we decided to use earlier).Google's code that we added to our HTML_HEAD.tpl template actually redirects random proportions of your traffic to the variant page. We therefore don't need to do any kind of linking strategy of our own.
Avoiding redirects using JavaScript (advanced)
The redirect technique is good enough for many, but is sub-optimal because the redirect takes time and resources.Another approach is to use JavaScript to randomly decide the version ourselves, and to tell Google Analytics which page variant is loaded.
For this to work we need to:
- Follow Google's tutorial
- Write the Composr code to pick the random version
- Don't put any code in HTML_HEAD.tpl (remove it if you added it already)
The Composr code change is pretty simple. The code from the previous step would look as follows:
Code
[semihtml]
{$SET,version,{$SET_RAND,1,2}}

{+START,IF,{$EQ,{$GET,version},1}}
   ...
{+END}

{+START,IF,{$EQ,{$GET,version},2}}
   ...
{+END}
[/semihtml]
We used {$SET_RAND,1,2} to choose the number 1 or 2 on a 1:1 ratio.
If we were doing multivariate testing with 3 versions, we could do {$SET_RAND,1,2,3}, for a 1:1:1 ratio.
We put this chosen number into a Tempcode variable using SET, then retrieved it with the GET symbol. Note how it is now GET (retrieve a Tempcode variable) not _GET like before (retrieve a URL parameter).
We had to use a variable as we are referencing a random number twice in the code, and need it to be the same each time!
Note how we are choosing the random number on-page. Another technique might have been to generate randomised links in advance. However, I doubt this works with Google Analytics and would come with a range of problems such as bookmarked old links, or ugly links. It's better we don't go down that route.
Starting the split test
Now that we have configured Composr so that users can get to see one of two randomised page versions, we want to actually start the split test to see which performs best (we haven't enabled it yet).Go back to the Google Analytics administration.
Google Analytics will need to verify the existence of the generated code through the given URL of the original version.
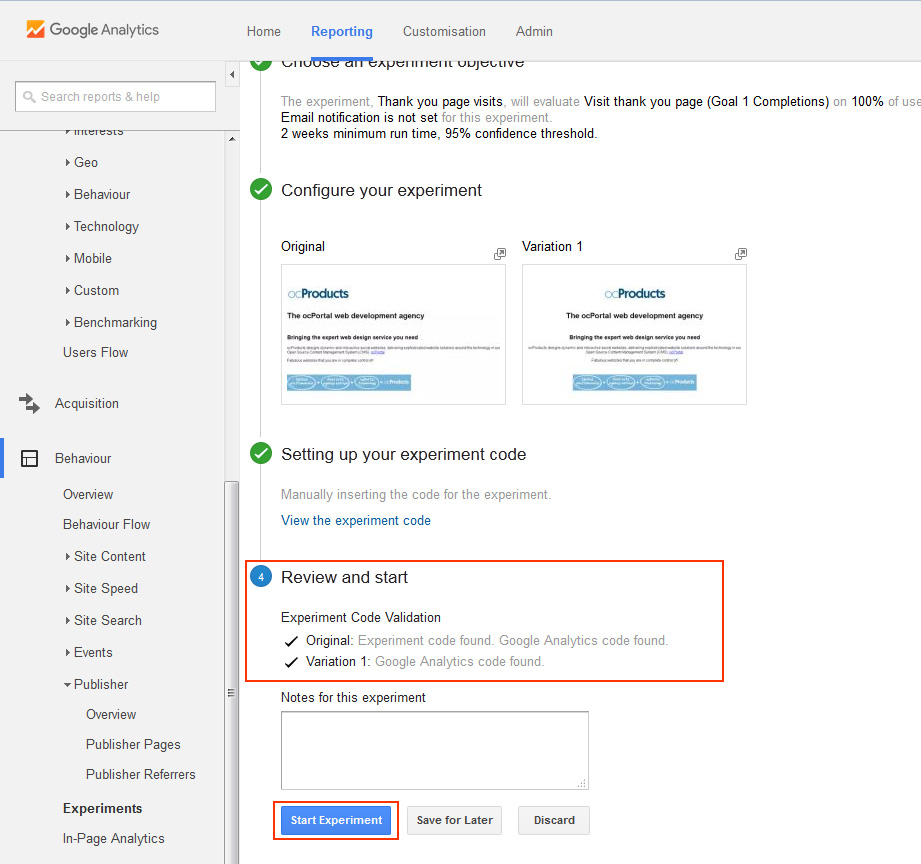
After successful verification, Google Analytics will start running once the "Start Experiment" button is clicked.
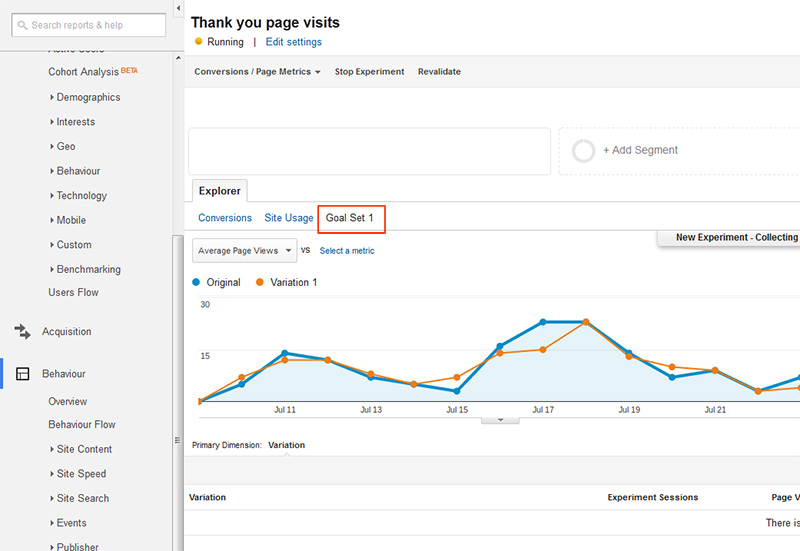
The experiment status will be shown in the "All Experiments" section.

To view the reports about the defined experiments, click on any of the listed experiments. The reports will show the relative performance between the original version and variate version – i.e. many users were able to reach the thank you page by making a PayPal payment, by version.
Suggestions for split tests
Split testing is both a science and an art. Here is a good resource suggesting some possible ideas to get you going.To do split testing well you need to be willing to put the time in, and be willing to be mercilessly analytical in your thinking.
You can split test things you might never have thought about, even outside the scope of Google Analytics. For example:
- give a different phone number extension for different randomised versions of copy, and record performance externally
- pass through a different Composr keep_referrer parameter to the join module, e.g. a or b. In this case make sure '2' and '3' are the IDs of admin accounts. You can then use the non-bundled referrals addon to track the referrals these accounts make.
Creating events (advanced)
The Google Analytics JavaScript library, which comes pre-integrated as a part of a Google Analytics deployment, provides a means for tracking custom events. That is events beyond just basic page views.Composr provides a JavaScript function, ga_track, to abstract this, which is pre-integrated in a number of places:
| Event description | Event name | Event parameter |
|---|---|---|
| Click banner | Banner | <bannerCodename> |
| Click Comcode link | URL | <url> |
| Click system links put out for many things (the HYPERLINK.tpl template) | URL | <url> |
| Download a download | Download | <filename> |
| Download an attachment | Attachment | <filename> |
| Play attachment audio | Audio | <url> |
| Play attachment video | Video | <url> |
| Open attachment overlay | Image | <filename> |
You may easily extend this with whatever custom events you want, then configure Google Analytics against those events. Just edit it into HTML within pages/templates, adding an onclick to links like follows:
Code (HTML)
onclick="return ga_track(this,'My Event Name','My Event Parameter');"
Alternatives to Google Analytics
With Composr we generally take a non-partisan approach to recommending third-party technologies. It is usually best we leave choices to the user when we haven't got our own direct solution, especially given that:- The landscape of web tools is so diverse,
- … and changing so fast.
- Third-parties may have onerous policies you can't deal with.
However, in a few very special cases we do think its best to pick one widespread tool and pre-integrate it, hence our strong support for Google Analytics.
In the interest of providing other options, here are some good alternative resources for you to consider…
Split testing tools:
Hosted analytics tool:
Concepts
- Multivariate testing
- An analytical technique to see which of multiple variations performs best.
- Split testing
- The same as Multivariate testing. A more conversational way of putting it.
- A/B testing
- Multivariate testing with exactly two versions (original version and 1 variation).
- Analytics Event
- An in-page user action that is explicitly triggered via tracking code.
- Analytics Goal
- A goal is a defined condition against an event.
- Analytics Experiment
- A configured case of multivariate testing.
- Multivariate original
- What multivariate testing is being performed against (i.e. with reference against the original version).
- Multivariate variate
- A variation on the multivariate original.
- Multivariate version
- Either the multivariate original or a multivariate variate.
See also
- Tempcode programming
- http://www.simplybusin…s/google-analytics-guide/
- https://moz.com/blog/a…guide-to-google-analytics
- https://econsultancy.c…nary-of-google-analytics/
- Activity statistics for your site (analytics)
Feedback
Please rate this tutorial:
Have a suggestion? Report an issue on the tracker.