
Composr Tutorial: Comcode and the attachment system
Written by Chris Graham (ocProducts)
Comcode is the Composr 'mark-up language', available in many content spots throughout the system. This tutorial explains how to use Comcode.Table of contents
Introduction
The main uses/advantages of Comcode are:- Intuitive content authoring (written just like plain text, no paragraph tags, special white-space rules, etc)
- Tying in dynamic functionality (such as filtered content via blocks)
- Tying in prebuilt special-effects (such as tabs or carousels)
- Achieving basic website styling and layout
- As a container for HTML (and other standard web technologies), for more advanced styling and layout
Many fields in Composr support Comcode, and 'Comcode pages' may be used to layout pages and panels of your site without having to do complex template editing, and without needing to use a restrictive layout configurer. The front pages and panels of Composr are, by default, Comcode pages. When we say "support Comcode", we mean you can just directly use Comcode in those fields. For example, most post/body fields for content are written in Comcode (e.g. the main body of a news article).
Unlike HTML, you do not need to use any complex syntax for Comcode – Comcode is written more naturally, and is converted into HTML for you (combining in whatever Composr content/data is needed to make things work). Comcode adds a lot of power that HTML cannot itself provide; for example, with Comcode you can easily add an automatically-generated table of contents, or draw on the power from any of our pre-designed dynamic 'blocks' (blocks are described in our Adding standalone pages of content (via Comcode) tutorial).
To be clear, Comcode is not a general language for designing websites. It is not in general an HTML-substitute, it is designed to work alongside it (it can embed HTML within it / mix with HTML). Your primary design would still be done using standard technologies (HTML, CSS, JavaScript). The Composr panels and front page are, by default, Comcode pages, so you can lay it out all in Comcode, but not much more than a block-block-block kind of sequential layout – you'll drop to the level of HTML (via the Comcode semihtml or html tags) for fine-tuned layout.
Those familiar with forum systems may see that Comcode is similar to BBCode in some respects.
There isn't a lot of need to directly learn Comcode, because our editor has a tag assistant to build Comcode tags for you and there's a WYSIWYG editor. Never-the-less, it doesn't hurt to know some of the tools you can use, especially if you choose to have the WYSIWYG editor disabled.
Simple example
Before we get into all the syntax it's best we just show a simple example of Comcode in action.Code
This is a simple document.

We could [b]make bits bold[/b].

We could:
 - write
 - a
 - list

Some actors:
1) Sean Connery
2) George Lazenby
3) Roger Moore
4) Timothy Dalton

---

Some  text   with lots of   spaces.
As you can see, it's very close to writing plain text.
The example looks like:
This is a simple document.
We could make bits bold.
We could:
Some actors:
Some text with lots of spaces.
We could make bits bold.
We could:
- write
- a
- list
Some actors:
- Sean Connery
- George Lazenby
- Roger Moore
- Timothy Dalton
Some text with lots of spaces.
The HTML generated would be roughly like:
Code (HTML)
This is a simple document.<br />
<br />
We could <strong>make bits bold</strong>.<br />
<br />
We could:
<ul>
<li>write</li>
<li>a</li>
<li>list</li>
</ul>
<br />
Some actors:
<ol>
<li>Sean Connery</li>
<li>George Lazenby</li>
<li>Roger Moore</li>
<li>Timothy Dalton</li>
</ol>
<hr />
Some text with lots of spaces.
<br />
We could <strong>make bits bold</strong>.<br />
<br />
We could:
<ul>
<li>write</li>
<li>a</li>
<li>list</li>
</ul>
<br />
Some actors:
<ol>
<li>Sean Connery</li>
<li>George Lazenby</li>
<li>Roger Moore</li>
<li>Timothy Dalton</li>
</ol>
<hr />
Some text with lots of spaces.
Further examples are available within the Comcode help page on any Composr site.
The basics
Comcode is primarily written and laid out as plain-text. Special tags (and other codes) are then interpreted with meanings:- Emoticon codes may be used (for Conversr, these are listed in the The Composr emoticon system tutorial).
- Comcode tags may be used for text formatting, such as [b]text[/b] to make some text bold.
- Comcode tags may be used to embed content, such as [block]main_contact_us[/block] to add a dynamic comments box.
- Horizontal lines may be added by placing a few -s on their own line.
- HTML-style entities can be use to place special characters inside the text (e.g. ®).
- Member profile links can be placed by typing {{username-goes-here}}, or {{?username-goes-here}} to show extra details when the mouse is hovered over and send a notification to the referenced member (Conversr only). Member profile links can also be placed by typing the simpler syntax (Conversr-only, always shows the extra details), @username-goes-here; the simpler syntax is a bit more flimsy due to the possibility for ambiguity if usernames have spaces.
- Wiki+ page links can be placed by typing [[pagename-goes-here]], or [[pagename-goes-here#anchor]].
- Table syntax (described in separate section below).
- List syntax (described in separate section below).
- Tempcode symbols and directives may be used, such as {$USERNAME} to display the username of the current user (described in the Tempcode Programming tutorial).
- Certain shortcuts may be used, such as (c) for © (described in separate section).
Additionally:
- Hyperlinks may be written directly, and are automatically detected; these will be interpreted by the media rendering system (for example, a YouTube video hyperlink would result in the video being embedded)
Tag syntax
The tag opens and closes
Tags are written as in a way similar to HTML, except using the [] brackets instead of the <> brackets, and a slightly more user-friendly notation.All tags have an opening tag, written [tag], and a closing tag, written [/tag].
If a tag is referenced that does not actually exist (e.g. I am writing some [nonsense]blah blah[/nonsense]), then it won't be read as a tag: it'll just display exactly as it was written.
The tag contents and wrapping
The text between the tags (the contents) is either:- something the tags modify – for example, for the b tag it is the text to make bold
- an otherwise critical parameter for the tags — for example, for the block tag it is the name of the block
When a tag is said to 'wrap' Comcode, it essentially adds on properties. For example with:
Code
[b][i]text[/i][/b]
Tag parameters
Tags may also take other parameters in addition to the tag 'contents' (what the tag has 'embedded'). These are written in like as follows:[tag a="a-value" b="b-value"]contents[/tag], where a and b are merely examples of named parameters, of which a tag can have many.
Often tags have a special parameter that is of critical importance which by convention we name param. A short-hand for writing:
Code
[tag param="value"]contents[/tag]
Code
[tag="value"]contents[/tag]
Escaping
If you need to include the " symbol inside a tag parameter, you can put it in as \" (e.g. [quote="Mr \"Happy\""][/quote]).Also, if you need to literally display a tag without it being parsed, you may type \[ for the opening bracket (e.g. \[i do not want this as italics]).
Table syntax
If using the WYSIWYG editor you'll be unlikely to want to use this.Table syntax is written as in the following examples…
Preview
This is the table summary
| Header 1, row 1 | Header 2, row 1 |
|---|---|
| Cell 1, row 1 | Cell 2, row 1 |
| Cell 1, row 2 | Cell 2, row 2 |
Code
{| This is the table summary
! Header 1, row 1
! Header 2, row 1
|-
| Cell 1, row 1
| Cell 2, row 1
|-
| Cell 1, row 2
| Cell 2, row 2
|}
or in reduced form,
Preview
This is the table summary
| Header 1, row 1 | Header 2, row 1 |
|---|---|
| Cell 1, row 1 | Cell 2, row 1 |
| Cell 1, row 2 | Cell 2, row 2 |
Code
{| This is the table summary
! Header 1, row 1 !! Header 2, row 1
|-
| Cell 1, row 1 || Cell 2, row 1
|-
| Cell 1, row 2 || Cell 2, row 2
|}
List syntax
If using the WYSIWYG editor you'll be unlikely to want to use this.The example in action
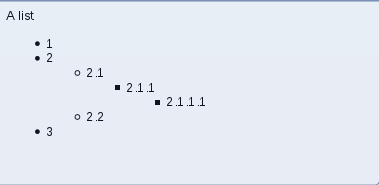
(Click to enlarge)
A line that is in the first level of a list is identified by the line starting with " - ". Subsequent lines that have the same prefix are shown as subsequent items in the same list.
If you wish to extend the list to a second level, just add the first line of the second level with two spaces before the hyphen, so that the line starts with " - ". Of course, you should start a second level of a list somewhere within the first level. Your list may have as many levels as you like, just by adding extra spaces in the lines at a certain depth. Be careful to not jump from, for instance, a depth of 1 straight to a depth of 3, as this will result in a Comcode error.
This all sounds more complex than it is, so I will give an example to show how in fact, it is really very easy to do:
Code
 - 1
 - 2
  - 2.1
   - 2.1.1
  - 2.2
 - 3
  - 3.1
See how simple it is: the number of spaces before the hyphen identifies the list level, the hyphen identifies it is a list, and then after a space (to make it look better when writing it) comes the actual line of the list.
You can also create ordered lists…
Code
Easy as:
a) a
b) bee
c) sea

Easy as:
1) one
2) two
3) three
If you need a list element to span multiple lines, you'll need to use the Comcode list tag instead. For example:
Preview
- one
and blank line - two
and blank line - three
and blank line
Code
[list="1"]
[*] one
and blank line
[*] two
and blank line
[*] three
and blank line
[/list]
Shortcuts
There are some short-cuts for use to use…| Shortcut | Appearance |
|---|---|
| (c) | © |
| (r) | ® |
| (TM) | ™ |
| -- | – |
| --- | — |
| ... | … |
| --> | → |
| <-- | ← |
Symbols and directives
Symbols and directives from Tempcode may also be used in Comcode.It is rare that you will want to include these as they are primarily designed for usage from templates. However, sometimes they can be useful.
Symbols let you:
- Insert certain individual bits of dynamic data (for example, {$USERNAME} to get the current user's username).
- Run some calculations (for example, {$ADD,1,2} produces 3).
Directives let you do logic tests (for example, {+START,IF,{$IS_ADMIN}}You are admin{+END}) and programming loops.
For a list of symbols/directives, see the Tempcode Programming tutorial.
WYSIWYG
Composr provides a WYSIWYG editor for those who would rather not type Comcode directly. You may mix in raw Comcode tags with the normal formatted text of the WYSIWYG editor if you wish; this is necessary if you need to insert things that don't have a regular appearance, such as blocks.Composr uses the Comcode semihtml tag is used in order to mix HTML and Comcode. You don't see this within the editor, but it is used when saving. Any HTML is subjected to Composr's whitelist/blacklist filter when it is being parsed for final output (see the "Security" section of the Advanced Comcode tutorial), unless the Comcode was submitted by staff in which case it would not be filtered.
Spacing
Comcode will create HTML that is laid out similarly to the Comcode. So, if you type two spaces between words, you'll see those two spaces. If you do 5 blank lines, you'll (roughly) see 5 blank lines.If you are using a lot of complex code, it is nice to be able to use white-space (e.g. indentation) to lay it all out. The semihtml tag will allow you to do this, as runs of white-space will be collapsed into a single white-space (like it is in HTML).
A small note about generated HTML:
For tags where generated-HTML would add automatic blank lines (visually speaking) after them (e.g. title), blank lines in Comcode after them are skipped in order to allow the Comcode itself to be attractive without affecting layout.
Tag reference
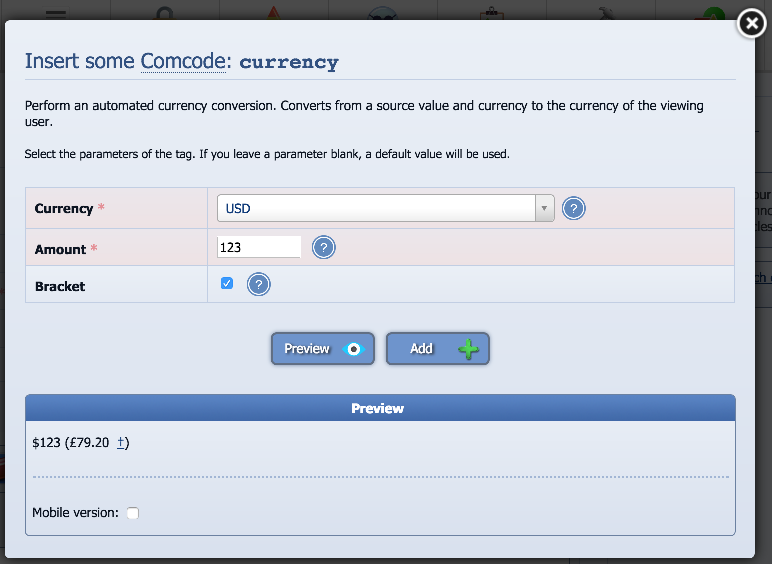
List of tags via the Comcode Tag Assistant

(Click to enlarge)
Sample form for adding a Comcode tag selected from the long list to the right
(Click to enlarge)
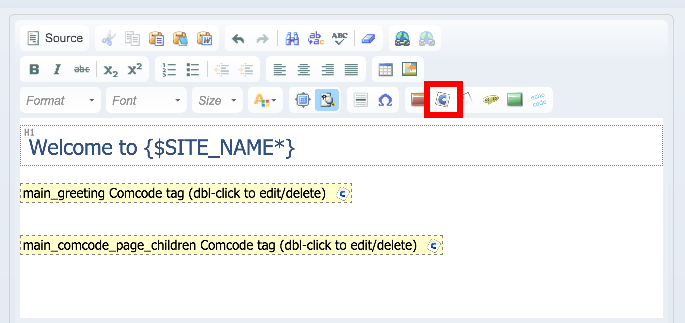
Comcode Tag Assistant button (WYSIWYG on)
(Click to enlarge)
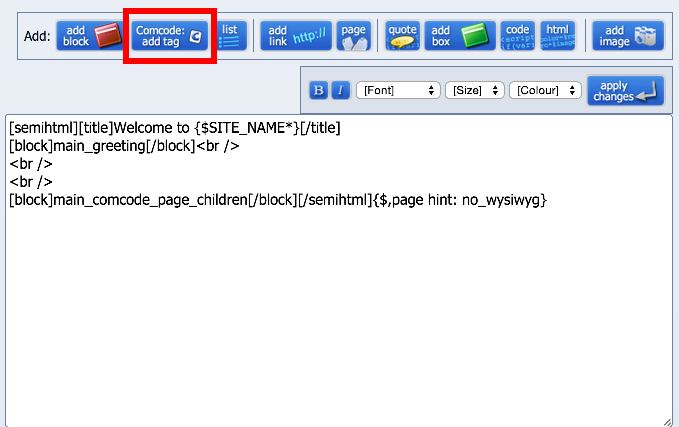
Comcode Tag Assistant button (WYSIWYG off)
(Click to enlarge)
In addition, new tags may be created (discussed in the Advanced Comcode tutorial).
Attachments
Editing an attachment
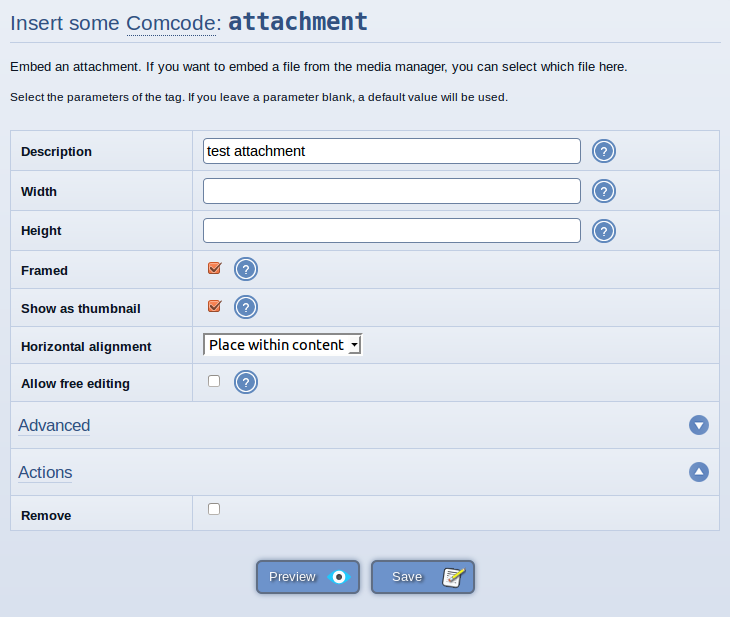
(Click to enlarge)
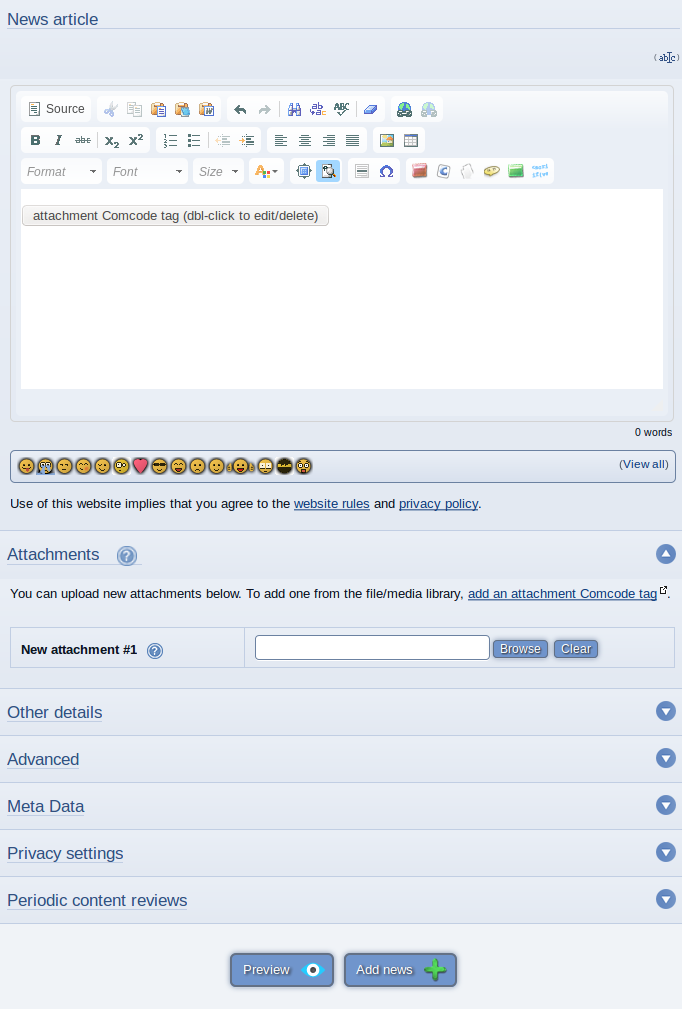
Adding an attachment with "Simplified attachments UI" disabled
(Click to enlarge)
Attachments might be embedded images, for example, but actually just about any other kind of file.
If the "Simplified attachments UI" option is on you just click the image button above the main typing area. Otherwise there is a special attachment interface shown underneath (see screenshots).
Using attachments couldn't be easier: you just choose a file (or many files) from your computer, and Composr will automatically add an attachment tag into the Comcode you are writing. You may then move that tag to any location you want, for placement of the actual attachment when the content is viewed.
There is special built-in support for in-line display of various media, and support of download of other types of file; any file can be added so long as the file type is in the allowed list of file types defined in the Admin Zone (see the Security tutorial for a discussion on this).
Attachments may be given special captions, which are usually displayed as a part of the attachment box.
Images can have thumbnails automatically generated and cached.
Be careful with copy & pasting

If the "Attachment cleanup" option is on (by default it is off):
Be careful when placing attachment tags in a Comcode spot that does not support attachments natively. This is supported, but the attachment will be deleted if its original content is deleted, as non-native Comcode spots have no way of recording that they have used it. In addition, if a viewer does not have access to the attachment's original content, they won't have access to your copy & pasted usage to a non-native Comcode spot.
Image media rendering
There are a number of different options for displaying attachments, so it can be a bit puzzling as to how a simple image attachment may display the image description you supply. This table will show you the defaults as defined by the MEDIA_IMAGE_WEBSAFE.tpl template:| Thumbnail option | Framed option | Description within Comcode | "Click to expand" shows | Description within overlay |
|---|---|---|---|---|
| On | Off | Tooltip on full-screen link & Alt-text (i.e. invisible) | No | Yes |
| On | On | Written inside frame & Alt-text (i.e. invisible) | Yes | No |
| Off | On | Written inside frame & Alt-text (i.e. invisible) | No | N/A |
| Off | Off | Alt-text (i.e. invisible) | No | N/A |
oEmbed
Links posted within Comcode will be processed via a system called oEmbed to try and turn them into embeds.For example, if you have a URL to a Google Map, the Google Map will embed automatically for you.
There are a number of configuration options that allow you to fine-tune this functionality.
Auto-save
If you type into a "posting form" (news posting, forum topic creation and replies, Wiki+ posting, Comcode page editing), then auto-save will be in place.Auto-save is automatic and runs behind the scenes. As you type it will save onto the server, if it has not saved within the last 20 seconds.
Auto-save can protect you if your computer crashes, if your Internet connection is lost, etc.
You will be prompted whether to restore when going back into the content posting UI you didn't finish the save from.
Note that the auto-save assumes that you are not switching browsers, as it stores flags indicating the presence of recovery data by using cookies in the browser.
Concepts
- Mark-up language
- A language designed so that text may be laid out by surrounding special elements around portions of the text to define meta-properties (such as font)
- Comcode
- Composr's mark-up language for the creation of formatted text and inclusion of dynamic elements
- Attachment
- A file attached to Comcode via a 'posting page' supporting Comcode field; attachments have special support for rich media
- Semi-HTML
- HTML and Comcode mixed freely together
- WYSIWYG
- What-You-See-Is-What-You-Get: the name of the type of interactive editing interface used for formatting text in many programs, including modern word processors
See also
- Adding standalone pages of content (via Comcode)
- Advanced Comcode
- Using blocks
- The Composr emoticon system
- Advanced Comcode
- WYSIWYG editing
- Tempcode Programming
- Security
- Filtering using Selectcode syntax
- Comcode User-guide
Feedback
Please rate this tutorial:
Have a suggestion? Report an issue on the tracker.