
Composr Tutorial: Advanced installation
Written by Chris Graham (ocProducts)
This tutorial covers advanced installation issues which most users do not need to be concerned with.Table of contents
Quick installation, without the quick installer!
If you have difficulties with the quick installer, and do not wish to upload all the files and perform chmodding individually, then you may wish to unzip directly to the server.Note that if you are on a suEXEC-style server the installer will tell you about it, and you will not need to set permissions.
Installing via the Linux shell
If you have difficulties with the quick installer, and do not wish to upload all the files and perform chmodding individually, then you may wish to unzip directly to the server.Due to the varying configurations of Linux servers, we can't provide precise instructions, so we do not recommend that anyone perform this if they are not already comfortable with the Linux shell. It also may not be that you actually have shell access on the server to do this.
We are not responsible for misuse of these commands; if you do not know the effect each will have on your system, do not run them until you do. Do not run subsequent commands if one command fails, or you might make a mess.
A sequence of commands similar to the following need to be run…
Enter the web directory:
Code (Bash)
cd httpdocs
Code (Bash)
wget <url-to-composr-zip-file>
Code (Bash)
unzip cms-<version>.zip
Code (Bash)
rm cms-<version>.zip -f
Fix all the necessary file permissions:
Code (Bash)
sh fixperms.sh
After this, you must delete the install.php file:
Code (Bash)
rm install.php -f
Unzipping from a webhosting control panel
Many webhosting control panels allow you to unzip uploaded files, using their file manager. You can do this on the manual installer archive.Permissions
If you have to use the manual installer and are not on a suEXEC-style system then you will need to set permissions on files and directories manually.Note for Linux-server users
If you are on a suEXEC-system (where the PHP script is run as your own user), the default 744 and 644 permissions should be suitable (with _config.php and _config.php.bak.* being 600 for additional security). The installer will tell you if you are on a suEXEC-system, otherwise assume you are not and you still will need to set the permissions.
If you have "shell access" (ask your webhost if you don't know), then you can automatically set these permissions by logging into your server with a program like PuTTY, and executing the file fixperms.sh.
If you don't have shell access, then you will need to manually set each folder to the correct permissions.
Here are the directories that need file permissions setting:
Tick (check) the highlighted boxes for all the files/folders listed to the left. This screenshot was taken on a Mac using Cyberduck, but the process is similar for other software. Usually to get to a screen like this you right-click on a file/folder and choose something like 'Properties'.
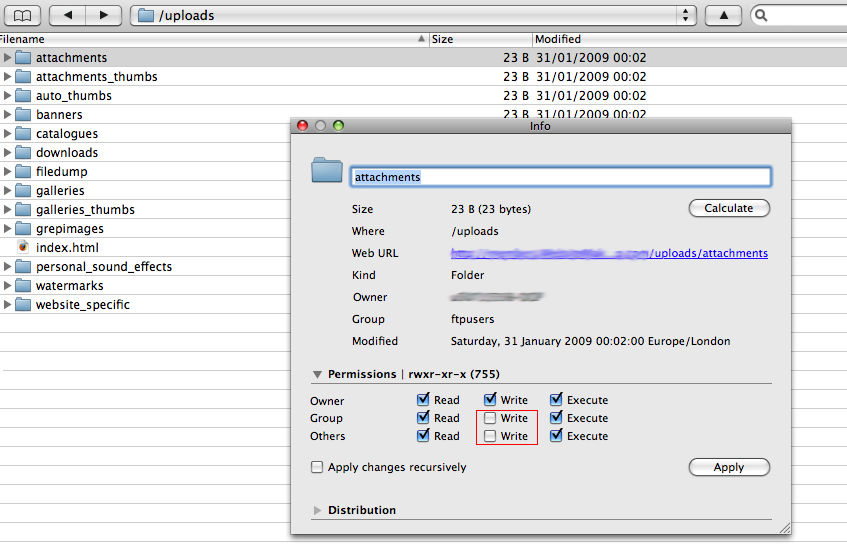
(Click to enlarge)
- adminzone/pages/comcode_custom/<for-each-language>
- adminzone/pages/html_custom/<for-each-language>
- caches/guest_pages
- caches/lang/<for-each-language>
- caches/lang
- caches/persistent
- caches/self_learning
- cms/pages/comcode_custom/<for-each-language>
- cms/pages/html_custom/<for-each-language>
- collaboration/pages/comcode_custom/<for-each-language>
- collaboration/pages/html_custom/<for-each-language>
- data_custom/modules/admin_backup
- data_custom/modules/admin_stats
- data_custom/modules/chat
- data_custom/modules/web_notifications
- data_custom/sitemaps
- data_custom/spelling/personal_dicts
- data_custom/xml_config
- exports/*
- forum/pages/comcode_custom/<for-each-language>
- forum/pages/html_custom/<for-each-language>
- imports/*
- lang_custom/<for-each-language>
- lang_custom
- pages/comcode_custom/<for-each-language>
- pages/html_custom/<for-each-language>
- safe_mode_temp
- site/pages/comcode_custom/<for-each-language>
- site/pages/html_custom/<for-each-language>
- text_custom/<for-each-language>
- text_custom
- themes/<for-each-theme>/css_custom
- themes/<for-each-theme>/images_custom
- themes/<for-each-theme>/javascript_custom
- themes/<for-each-theme>/templates_cached/<for-each-language>
- themes/<for-each-theme>/templates_custom
- themes/<for-each-theme>/text_custom
- themes/<for-each-theme>/xml_custom
- themes
- tmp (this is a folder needed only by the quick installer – and you will need to make it and set permissions immediately or wait until the quick installer makes it and then fails due to lack of permissions on it)
- uploads/attachments
- uploads/attachments_thumbs
- uploads/auto_thumbs
- uploads/banners
- uploads/catalogues
- uploads/cns_avatars
- uploads/cns_cpf_upload
- uploads/cns_photos
- uploads/cns_photos_thumbs
- uploads/downloads
- uploads/filedump
- uploads/galleries
- uploads/galleries_thumbs
- uploads/incoming
- uploads/personal_sound_effects
- uploads/repimages
- uploads/watermarks
- uploads/website_specific
Set the following to 666 (full read/write permissions):
- adminzone/pages/comcode_custom/<for-each-language>/*.txt
- adminzone/pages/html_custom/<for-each-language>/*.htm
- cms/pages/comcode_custom/<for-each-language>/*.txt
- cms/pages/html_custom/<for-each-language>/*.htm
- collaboration/pages/comcode_custom/<for-each-language>/*.txt
- collaboration/pages/html_custom/<for-each-language>/*.htm
- data_custom/errorlog.php
- data_custom/firewall_rules.txt
- data_custom/modules/admin_backup/*
- data_custom/modules/admin_stats/*
- data_custom/modules/chat/*
- data_custom/modules/web_notifications/*
- data_custom/sitemaps/*
- data_custom/spelling/personal_dicts/*
- data_custom/xml_config/*.xml
- exports/*/*
- forum/pages/comcode_custom/<for-each-language>/*.txt
- forum/pages/html_custom/<for-each-language>/*.htm
- imports/*/*
- lang_custom/<for-each-language>/*.ini
- pages/comcode_custom/<for-each-language>/*.txt
- pages/html_custom/<for-each-language>/*.htm
- safe_mode_temp/*
- site/pages/comcode_custom/<for-each-language>/*.txt
- site/pages/html_custom/<for-each-language>/*.htm
- text_custom/*.txt
- text_custom/<for-each-language>/*.txt
- themes/<for-each-theme>/css_custom/*
- themes/<for-each-theme>/images_custom/*
- themes/<for-each-theme>/javascript_custom/*
- themes/<for-each-theme>/templates_custom/*
- themes/<for-each-theme>/text_custom/*
- themes/<for-each-theme>/theme.ini
- themes/<for-each-theme>/xml_custom/*
- themes/map.ini
- uploads/attachments/*
- uploads/attachments_thumbs/*
- uploads/auto_thumbs/*
- uploads/banners/*
- uploads/catalogues/*
- uploads/cns_avatars/*
- uploads/cns_cpf_upload/*
- uploads/cns_photos/*
- uploads/cns_photos_thumbs/*
- uploads/downloads/*
- uploads/filedump/*
- uploads/galleries/*
- uploads/galleries_thumbs/*
- uploads/personal_sound_effects/*
- uploads/repimages/*
- uploads/watermarks/*
- uploads/website_specific/*
- _config.php
Remember – if you chose the quick install option, it's likely that none of these permission settings are required.
CGI servers
It has been reported to us that some CGI-based PHP installations (as opposed to module-based PHP installations) require PHP scripts to be given 'execute' permission. This is a very rare (and insecure) configuration, but if there is this requirement, the following files need to be given execute permission…- Any index.php file
- All PHP files in the root directory, except _config.php and all _config.php.bak.* files.
- All PHP files in the data directory
- All PHP files in the main directory for a zone (e.g. /, and /adminzone) directories
The quick installer handles this automatically.
Installing on Windows (IIS)
This section mostly only applies if you are using Microsoft's web server, Internet Information Server (IIS).See the Installing Composr on a Windows desktop tutorial if you just want to install on your own computer and you are just using your website locally, behind a firewall – or if you are installing via the Microsoft Web Application Gallery (which will set permissions for you).
There are two problems relating to file permissions, that complicate the installation on Windows. Unfortunately these problems are completely out of our control, and apply to any PHP system installed on a Windows server: all we can do is help you get through them. Most home systems have full permissions set by default, so are actually easier to install on than Linux. However, webhosting companies often impose a more rigid permission scheme due to their shared hosting environments.
The first problem is that there is no real standard on Windows to exactly what file permissions are appropriate. To understand file permissions, you must understand that the web-server (or the PHP CGI client, if in CGI mode) runs PHP scripts under a username that is not just 'Administrator' (which would be a highly foolish thing to do). What that username is depends on how the environment was configured; it may be a generic web user (usually named IUSR_<computer-name>), or it may be the username tied to your own webhosting account. It is this username that needs to have access to write to certain directories and files inside your installation.
A generic trick is to use the username 'Network' as the username to grant permissions to. While this is not the username that the script runs at, it is a virtual username representing any username on the Windows Domain that the computer on; setting permissions to this should do the trick, but at the expensive of it granting more permissions than are required. Ideally, you should find out exactly what username PHP scripts run as, and grant permissions to it.
The second problem is that there is no automated way to set file permissions on a Windows machine from a PHP script. This leaves three possibilities for a Windows machine user:
- Set it so the Composr installation directory has full permissions for the PHP-user before extraction. Whether this is secure or not really depends upon your environment; if CGI is disabled, and PHP has open_base_dir enabled, then it may be secure from tampering by other server users. Also, if there are no other server users, then it shouldn't be a problem. This trick assumes that the directory has been set to have files created in it inherit permissions; this is usually so, and perhaps something you can ensure is true yourself.
- Ask the server administrator to execute, or find a way to execute yourself, the fixperms.bat file. This will set the file permissions for you, but this is an advanced option and may be prone to environmental issues. If using the quick installer, the bat file will need running at the point the installer complains about file permissions; otherwise it should be executed before installation.
- Manually set the file permissions. See the Installation tutorial for a list of file permissions that need to be set. Where Linux would require '666' (for a file) or '777' (for a directory) permissions, you would need to assign write permissions as specified above.
Due to these problems, we would have to recommend that if you have a choice, that you don't use a Windows webhost unless you are experienced with the Windows security model. It is more complex, less standard, and less documented, than the Linux model (although, actually a lot more powerful).
Installing on Cloud hosting
There is nothing stopping Composr working on compatible cloud hosting.One note is that PaaS providers may host files separately to where execution happens, and this can slow down disk access. You may need to change the "Number of files per cycle" in the quick installer to something lower such as 50 to avoid time-outs (e.g. white screens).
Rackspace Cloud
Specifically on Rackspace Cloud, you will need to set execution permissions of the install.php file lower than the defaults may have been after you uploaded:- Open your SFTP/FTP client and find install.php
- Access the permissions for the file, and remove write access for the owner, group, and others (the UNIX code for this is 444)
Working out of git
It is possible to run Composr direct from a main git repository checkout.However, be aware the main git repository contains all non-bundled addons. It is used by developers who want to keep everything in the ecosystem in-harmony when developing new features.
If you are going to run from the main git repository, it is best to install it properly rather than just downloading the ZIP from GitLab. Then you can do git pull commands whenever you want to update the code with the latest changes.
If you are a programmer making your own standalone site you can use git, but you should make your own repository from a normal Composr install.
Here is some specific advice for people working from our git repository:
- To temporarily turn off addons, use safe mode (&keep_safe_mode=1)
- You'll want to uninstall lots of non-bundled addons hosted in the repository. When merging with upstream files may come back, so there is a script delete_alien_files.php which should help you decide what files to delete.
- Running from git runs Composr in dev mode, which adds extra constraints and checks (or maybe even removes some designed for live sites). No live site should ever be left in dev mode. To change that add this to _config.php: $SITE_INFO['dev_mode'] = '0';
- To stop Composr complaints about the installer being there, while also blocking the installer from running, create empty install_ok and install_locked files.
See also
- Installation
- Security
- Webhosting
- Installing Composr on a Windows desktop
- Installing on Google App Engine
Feedback
Please rate this tutorial:
Have a suggestion? Report an issue on the tracker.