
Composr Tutorial: Running advertisements (via the banner system)
Written by Chris Graham (ocProducts)
A banner

(Click to enlarge)
- Serving banners directly from a third-party banner network, via the HTML they provide for you to include in your site
- Serving your own set of banners (perhaps paid banners, or perhaps community banners)
- Serving community banners, bought via the Point Store
- Creating your own banner network between independent sites, where sites get as many views/clicks out as they provide in (i.e. a banner exchange program)
Table of contents
- Composr Tutorial: Running advertisements (via the banner system)
Setting up banners
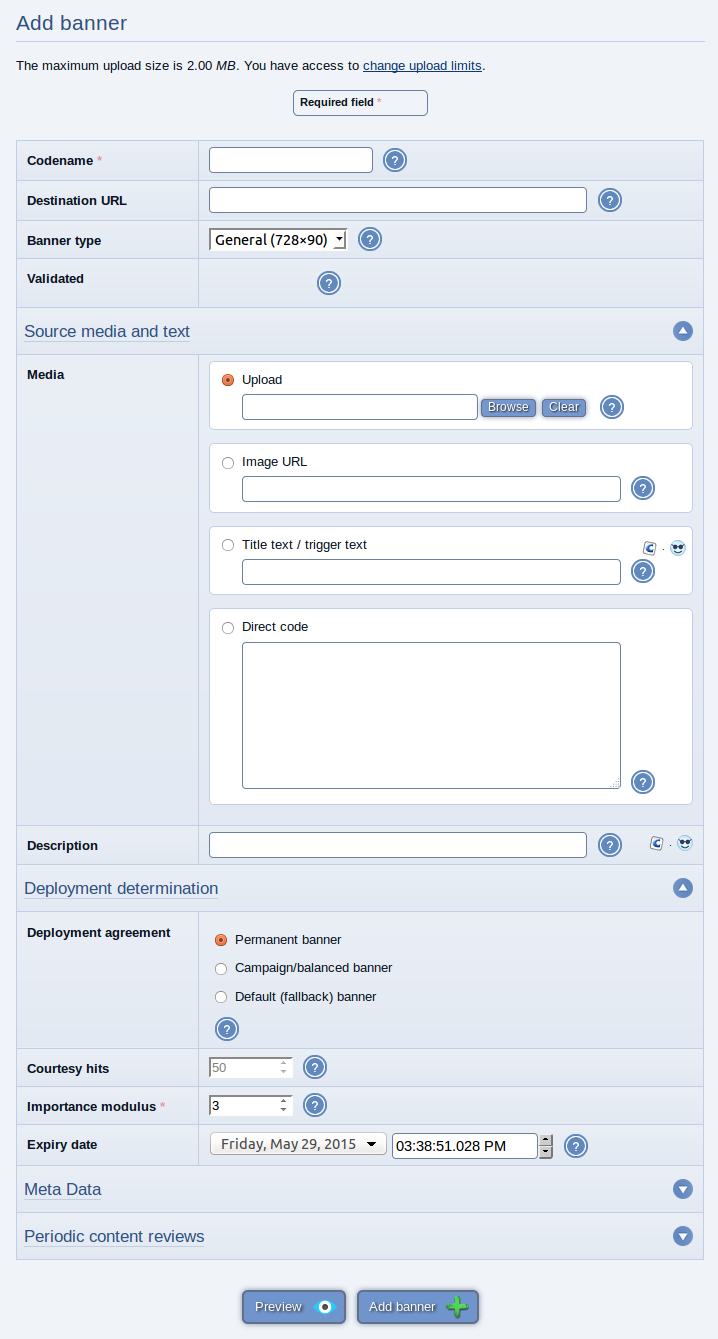
Adding a banner
(Click to enlarge)
There are many options to allow a rich and flexible rotation system. These include:
- The deployment agreement. A permanent banner can always be shown. A campaign banner is given a finite number of 'clicks', and will not be shown when the clicks have run out. Default banners can always be shown, but are generally set to only appear when there are no permanent or campaign banners.
- You may specify a banner type. Types are set up to enforce certain restrictions (image dimensions, and file size) on the banners within that type. It is possible to call up the Composr banner.php with ?b_type=<type on the URL, which will force only banners of that type to be shown. Likewise, the 'BANNER' symbols first parameter can be set to <type> (e.g. {$BANNER,skyscraper}). This is useful for a number of things, but perhaps the most significant is that is allows you to distinguish between banners of different sizes, storing each in an effectively separate rotation. You can then edit your templates to reference these different rotations, by pasting in the appropriate HTML (see BANNER.tpl for an unfiltered example – this is the HTML used for the banner that appears in the top-right by default).
- Banners may be given an expiration date; this is useful in many situations, such as if a banner becomes inappropriate after an advertised event finishes, or if a client has only paid until a certain date.
- The 'importance modulus' allows you to balance the likelihoods of different banners being shown. The higher the number, the more likely the banner will be shown. This is explained in more detail in a section below.
You can delete a banner from the bottom of its edit form.
Deployment agreement
The three deployment agreements are:- Permanent
- Campaign
- Default
The system will show permanent and campaign banners as a 50:50 split. Default banners will only appear if there are no permanent or campaign banners to show.
Campaign banners have allocated hits, which can be retroactively raised. Hits can be allocated automatically via a banner network (explained in a separate section).
Supported media types
The banner system supports different broad categories of media type:- Images (uploaded or given by "Image URL")
- Flash (uploaded or given by "Image URL")
- Text ("Title text / trigger text")
- Frames (given by "Image URL")
- Direct code
Images
By default image banners will open a new window when clicked, unless the banner is to a local URL in which case the same window will be used. This behaviour can be modified by editing the BANNER_IMAGE template.Flash
Flash (.swf format) is not recommended anymore for modern websites, as many users (e.g. mobile users) will not have the Adobe Flash plugin installed. Desktop browsers are moving toward dropping it completely.Text
You can add textual banners, which by default look exactly like Google Text ads. The best thing though is that you can set them to be 'hot text', which means that any Comcode will be scanned for use of the keywords, with matches leading to inline display of the text banners.Frames
If you specify a URL to a script (such as the URL to another Composr installation's banner.php) instead of an image, then that script will be loaded in a frame, and is assumed to provide its own rotation inside that space. Because of this, only the script URL is required in place of the image URL, and the actual 'URL' field may be left blank and will be ignored (as the linked rotation provides these itself).Linking to non-image URLs instead of images is handy in a number of situations, including:
- if you want to chain banner networks together
- if you want to make a page that displays a randomised banner based on some kind of algorithm (such as choosing randomly from a folder of pictures)
Direct code
In order to use banners from a third-party banner network, you often are asked to incorporate a chunk of HTML into your site. Composr makes this easy for you, as you can add banners consisting of raw HTML (or even PHP code).Importance modulus (advanced)
All banners are balanced against each other by the 'importance modulus', which is defined for every banner. It is not a percentage or fraction, but the banner with the highest importance level is the one most likely to get shown.Mathematically, the chance of a banner X in a set Q being shown is:
Code
P(X) = IMPORTANCE(X) / SUM(IMPORTANCE(Q))
For example:
Imagine a set Q of 901 banners. 900 have importance 1, and 1 ("X") has importance 100. What chance has X got to show?
Code
P(X) = IMPORTANCE(X) / SUM(IMPORTANCE(Q))
     = 100 / (900 * 1 + 100 * 1)
     = 100 / 1000
     = 0.1
     = 10%
As new banners are added, the chance of any existing banners being shown will naturally decline. If you need a banner to show as much as before the importance module will need to be adjusted higher.
Permissions
Who may view what
Configuring the HTML to an external banner/rotation

(Click to enlarge)
Who may avoid banners
Any usergroup with the "Avoid banners" permission will not see banners. Super administrators will have this permission (as they always have all permissions), and hence super administrators will never see banners. To test banners from a super administrator account (such as the default 'admin' account), use the 'SU' feature (see the Testing access and privileges tutorial, Access control and privileges section) to switch to the test account: add &keep_su=test onto the end of a URL.Geocoding
An advanced option available for banners is to specify what countries it is targeted to. Only users from those countries will see the banner.This requires that the stats addon be installed, and the geolocation data be set up.
Usually geolocation data is installed automatically, but if necessary you can force it (from Admin Zone > Audit > Site statistics > Install geolocation data).
Banner status
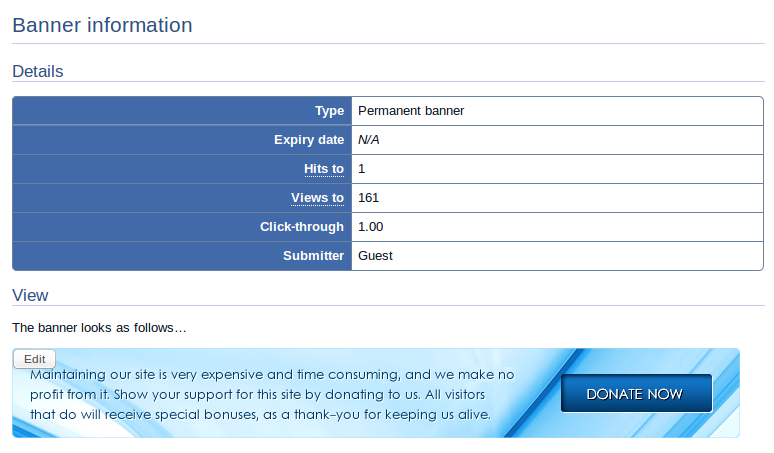
Viewing the status of a banner
(Click to enlarge)
The details shown may have important statistical significance. For example, a banner that is viewed a lot, but never clicked, may not be a 'profitable' one to have in the rotation (note however, that a simple banner view could impact a visitor, and thus it actually being clicked is not always a measure of the user impact).
Staff may view more details banner statistics from Admin Zone > Audit > Banner statistics.
Banner networks / displaying rotation externally (advanced)
You may run your own banner network (a banner exchange program). Each banner added may be associated directly with a site for that banner, with that site also showing banners from the network.Banners are displayed on a site network using an iframe going to a URL like:
http://yourbaseurl/banner.php?source=sitename&b_type=bannertype
The full HTML code for this is given out when you add a banner. The source comes from the name of the banner you added, which for purposes of a banner network, is considered also as the codename of the site also showing banners in the network.
A source site won't be served its own banners to show. If you wish you may just strip out the source parameter if you don't need such a restriction – if, for example, you are just using the banner sharing code externally for some other purpose.
A "hit balancing" system is used when banners are added as campaign banners: for each click they put into your network, they get an extra click out.
Having multiple banner sets
You may have multiple sets of banners, determined by the 'Type' of the banners. A banners 'Type' defines what set it goes in.Each of these sets may be called up as a separate rotation, displayed in a different place, and it is often useful as a convention to use sets to group together those banners that have the same width and height.
To set up a new rotation, displayed in the layout in a space of your choosing, use the following instructions.
- Create a new banner type from Content Management > Banners.
You will be able to edit the banner type from under here later if you need to.
You can delete a banner from the bottom of its edit form. - Copy this code from the GLOBAL_HTML_WRAP.tpl template:
- Change this bit of the above:to:
Code
{$BANNER}Where example is changed for whatever type string you've used for the banner set you want to show.Code
{$BANNER,example} - Change the global_banner CSS class used in the code snippet to a new CSS class of your own choosing (or just pull it out if you don't require any special styling around your banner).
- Place the code in any template you like (or multiple ones). Obviously you'll need to write it in in such a way as for it to fit well into the layout. This is a standard CSS/XHTML themeing issue.
The Point Store
If you wish to use your banner space, in part of full, for showing banners that your community want, then you may wish to enable the Point Store, to allow members to buy banners using points.More information on the Point Store is provided in the Creating an economy/reward-system for members via points tutorial.
Alternatively, members may directly submit banners (i.e. without using the Point Store), and you may choose to validate them without requiring the members to spend their points.
Troubleshooting
If banners won't show check:- Banners are enabled in the configuration.
- You are not viewing as a super-administrator or any other usergroup that has 'Avoid banners' permission.
- Your banner is validated.
- Your banner has not expired.
- Your banner has hits assigned, is a permanent banner, or is a default banner and there aren't non-default banners obscuring it.
- That the banner type your banner is in is displayed (by default only the default 'Default' banners are displayed, in the GLOBAL_HTML_WRAP.tpl template). See "Having multiple banner sets".
- The banner type has permissions for the viewer's usergroup.
Banner waves
In addition to normal banner display, you can also use the main_banner_wave block to display all banners within a type as a single advertising block. This is useful for displaying a list of sponsors. An example of this block will be in the worked example that follows.You can also use the main_banner_wave block for displaying individual banners of your choosing, by limiting it to one specific banner within the block options.
Worked example: adding a square text banner
Let's imagine we want to add a new banner rotation to a site: square banners.The first step is to define a new banner type…
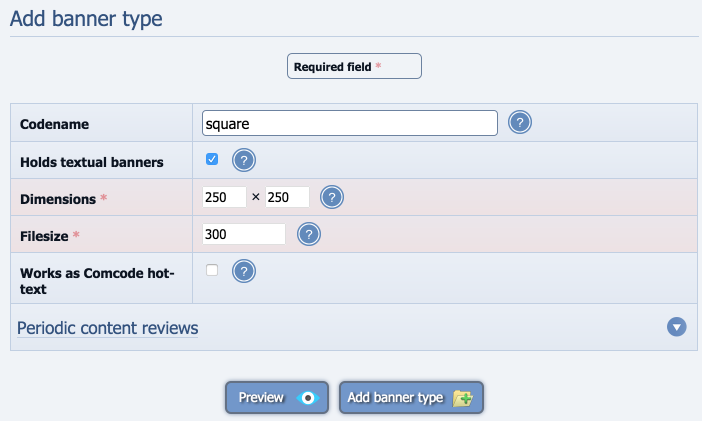
Adding the banner type
(Click to enlarge)
- Log in, go to the "Admin Zone" and select "Banners" in the "Content" section dropdown list. In the "Banners" page you should see the icon "Add banner type": select this, which will take you to banner type form.
- The form will ask for some details. It is highly recommended that you always provide the dimensions as per IAB guidelines.
Enter the following in the fields:- Name of the Banner type: square
- Tick (check) "Holds textual banners"
- Set the dimensions to 250×250
- Set the Filesize to 300. Large files can cause your site to run slowly; however since we are creating a textual banner we have to enter the maximum characters the banner can have, and 300 seems a good number
- Add the banner type after entering all the details by clicking "Add banner type"
Adding the banner
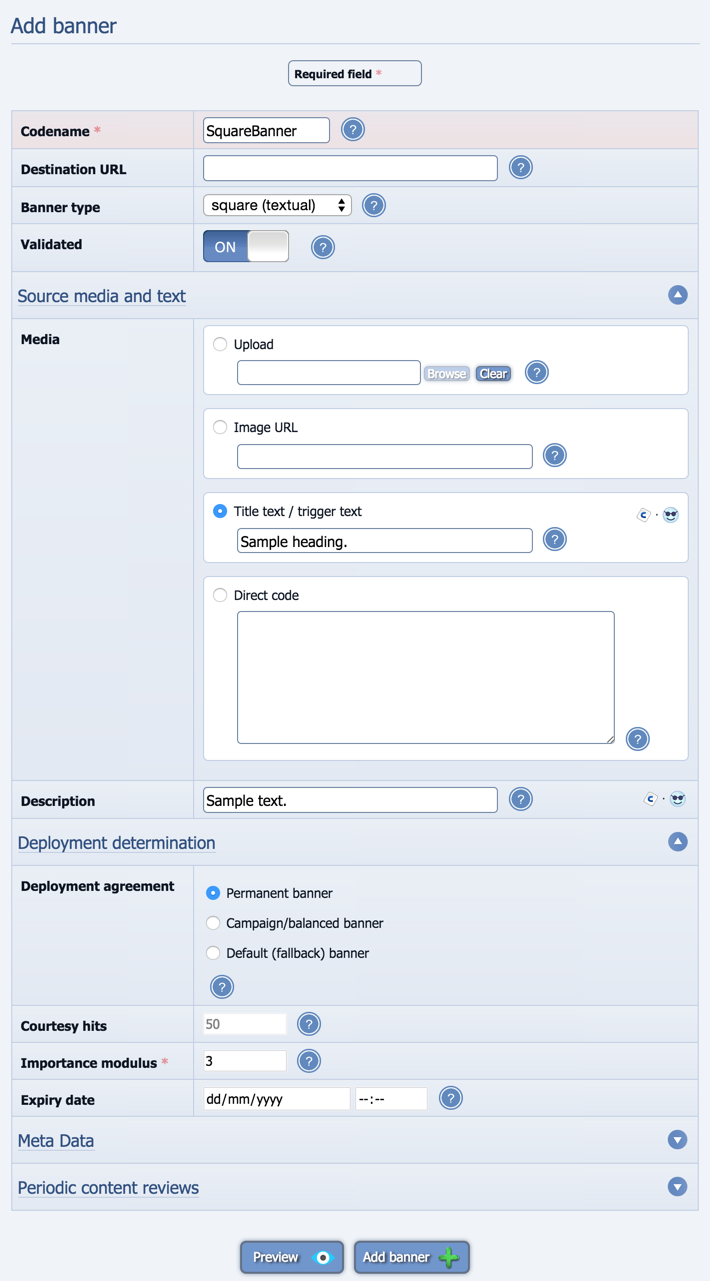
(Click to enlarge)
- If you're still on the screen asking you what to do next, click "Add banner". Otherwise go back to "Banners" page in the "Content" section, and select the "Add banner" icon.
- This will take you to a form again. Give a name to your new Banner, say SquareBanner
- The next field is "Destination URL", meaning the link to a page or URL where the banner should link to when the user clicks on it. We'll leave it blank for our simple text banner
- Next is Banner type, select the newly created banner type "square"
- In the media you can upload an image for the banner, write some title text, or even write a code snippet directly. We will test with text since we created a textual banner.
- The text from the previous step is just the title text, so we need to put our main text into the "Description" field.
- The final section in the form provides various settings for determining banner display. The deployement agreement lets us choose whether the banner is a permanent banner which will be always displayed, or a campaign banner, or a default fallback banner meaning the banner displays only if there are no other banners available. We'll leave all the settings in this section alone as these settings are more advanced than we need.
- Save the banner via the "Add banner" button.
Next we need to tie the banner into our layout. There are a couple of options:
- using a banner wave (the main_banner_wave block)
- using a rotation (the {$BANNER} symbol directly in a Comcode page or a template)
Adding the wave block
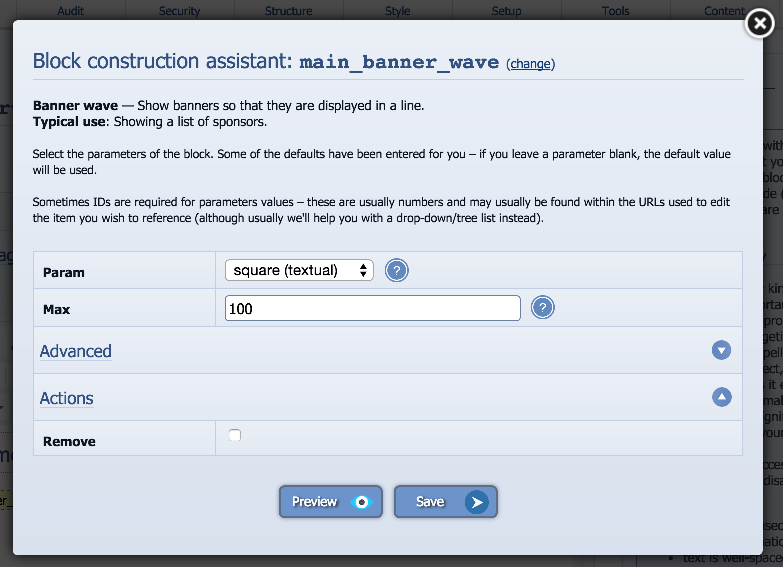
(Click to enlarge)
- Navigate to the page where you want the banners to appear
- Click "edit this page" under the page
- Select where in the page you want the block to be
- Click the add block button (the red button in the editor toolbar)
- Select 'Banner wave'
- Choose the banner type (our square type)
- Choose the maximum number of banners you want to display. This is set to 100 by default which would show lots (if lots had been added); if you set this number lower than the number of banners you have uploaded then it will randomly shuffle the banners.
- Click "Use"
- Save the page via the "Save" button
- Observe the wave is added to the page now
Adding the new square banner using a rotation:
- Navigate to the page where you want the banners to appear
- Click "edit this page" under the page
- Select where in the page you want the block to be
- Paste in the following code: {$BANNER,square}. This symbol invokes the internal banner code. "square" is passed as a string parameter which defines the type of banner.
- Save the page via the "Save" button
- Observe the banner is added to the page now
Concepts
- Default banner
- A banner that is displayable at any time (i.e. both when campaign and permanent banners would be chosen for viewing), but is intended to have a low importance level such that it is shown when the system is low on banners
- Campaign banner
- A banner that has a limited number of hits, but with support for hit balancing should the banner be tied to a site that is generating banner network clicks
- Importance modulus
- A number representing the how likely a banner is to be shown, relative to the other importance moduli (in essence, they are ratios to each other of how likely the banner will be shown)
- Hit balancing
- A feature that allows a banner network to be created such that banners get as many hits out of the system as their sites put clicks into the system
- Banner
- An advertising banner
- Rotation
- Randomised display of banners within a set (although guided by various settings, such as importance modulus)
Suggested advertisers
Here are some ideas of where to source ads from:- Contextual CPC/CPM-style advertising
- Google adsense
- Bing ads
- Paid Placement
- BuySellAds
- Commission Junction
- Avantlink
- Google adsense
- Affiliate advertising (networks)
- Commission Junction
- Avantlink
- Rakuten
- Linkshare
- Shareasale
- Clickbank
- Affiliate advertising (direct)
- Amazon
- Your own "advertise here" banner, directly attracting advertisers to contact you
If you are using Google Adsense and don't see any banners, consider whether your account is set up correctly.
See also
Feedback
Please rate this tutorial:
Have a suggestion? Report an issue on the tracker.