Composr Supplementary: How to Change Your Favicon and Site Logo in Composr
Written by Steve Jarvis, Sponsored by Arvixe hosting
There are two styling elements you will probably want to change when you begin working on your new Composr website. You will need to change the site logo and you will also need to change your website's favicon.How to Change your Favicon
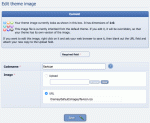
Favicon editing in Composr
A Favicon is 16×16 pixels. Web browsers will resize your image for you to ensure it is the correct size, but it is important if the image you use is at very least square. You also need to make sure there isn't too much detail as this will be lost if it is sized down.
Actually the above was a simplification: nowadays favicons come in many sizes, and you can include multiple icons within a single .ico file. Making a 16×16 one is a good start. The Supplementary web technologies (media, social networking, etc) tutorial goes into more detail.
Changing the Favicon Step by Step
- Log in to the Admin Zone
- Navigate to the Style section of the Admin Zone menu
- Choose the Themes icon
- Scroll to the theme you currently have live on your site
- Choose Edit theme images
- Expand the first tray, titled "(unnamed)"
- Scroll down to Favicon and click on it
- Choose and upload your image and click the save button
- Check your Favicon is appearing correctly in the tab which displays your website
- (If the favicon doesn't look correct edit the image and repeat the process)
How to change your website logo
Theme image editor in Composr
The simplest way to edit your main website logo is to:
- Go to your homepage
- Hover your mouse over the logo in the top left until you see a popup to "edit theme image"
- Click the popup which will take you to the edit screen
- Click the Upload option and upload your new logo image
- Click to save
- If your Logo does not look right you may need to tweak your CSS or the image and repeat the steps above.
Changing the website logo Step by Step via the Admin Zone
- Log in to the Admin Zone
- Navigate to the Style section of the Admin Zone menu
- Choose the Themes icon
- Scroll to the theme you currently have live on your site
- Choose the Edit theme images icon
- Scroll down to the Logo section and expand it
- Choose the logo titled logo/-logo
- Click the Upload option and upload your new logo image
- Click to save
- (If your Logo does not look right you may need to tweak your CSS or the image and repeat the steps above.)
There is also the logo/standalone_logo theme image that you should also change as it is used for e-mails etc.
Feedback
Please rate this tutorial:
Have a suggestion? Report an issue on the tracker.


