
Composr Tutorial: Tools for subsites and subcommunities
Written by Chris Graham (ocProducts)
Composr is designed to be able to support large websites, and a common features of the largest sites is to have subsites and/or subcommunities within the larger website. There are a number of features in Composr to support this, including:- Zones (different zones may be created for each subsite, located under a URL beneath the main site, with their own set of pages)
- Redirects (using redirects, common modules, such as the download module, may be made to appear as if they are running from individual zones)
- Categories, and virtual roots (using a combination of separate categories [and sub-branches there-of] for different subsites, and the 'virtual root' system, it can be made to appear that each subsite has their own catalogue/download/gallery)
- Comcode pages, Chatrooms, Polls (all these support individual creating and referencing, such that different instances can be presented to different subcommunities)
- Banners, Calendar (all these support category based referencing such that a division between subcommunity interests can be created)
- Sub-forums (different communities can be given their own branch of the discussion forums, with the Conversr 'Clubs' feature providing special support for this)
- Themes (different themes may be applied to different zones, giving subsites individual looks)
- Usergroups and access privileges (members of subcommunities may be grouped by usergroup, and permissions assigned accordingly)
- Custom profile fields [Conversr users only] (custom profile fields can be made so that they only apply to a single usergroup: thus allowing specification of user data that applies only to specific subcommunities)
- More advanced techniques discussed in the Advanced techniques for multi-site-networks tutorial
Usergroup management
Managing a usergroup
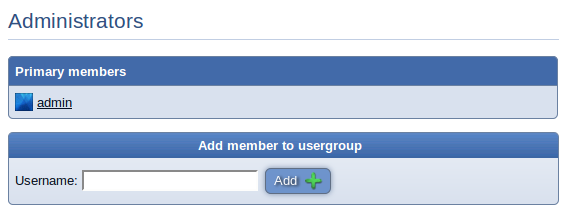
(Click to enlarge)
Members exist in a primary usergroup, and may be placed in any number of secondary usergroups. Usergroups serve many purposes, including:
- demonstrating rank (i.e. a status symbol)
- grouping members for common permission allocation
- highlighting involvement
- incentivising involvement (member contributions to the site and community)
Usergroup(s) is commonly abbreviated to group(s).
Ranks
Members will automatically enter usergroups on their rank ladder as they accumulate points. Specifically, the total points ever earned, as point spending does not impede raising through the ranks.Their visible rank, and privileges change in accordance to their new rank usergroups.
Rank ladders are not formally codified. A member can be considered on a rank ladder if they are on a usergroup with any particular promotion path. Members may be on multiple ladders by being in multiple promotable usergroups. Usually a site will only have on rank ladder though.
There is a default rank ladder that goes:
Newbie → Regular → Local → Old timer → Local hero
It is recommended that you leave all non-staff members such that their primary usergroup stays within this rank ladder, and use secondary usergroups for the purpose of placing them in subcommunities, and granting additional permissions (a member has the 'best' permission combination out of all the permissions granted to all of their usergroups). This keeps things consistent, allowing these members to have both your main rank and other usergroup memberships.
You can attach your choice of rank image to any usergroup. A default set of images is supplied for the default rank ladder.
The Setup Wizard has an option to remove the default rank ladder and have a simple 'Members' usergroup instead.
All this does is rename Newbie, change the promotion target setting on Newbie to N/A, and delete Regular/Local/Old timer/Local hero.
New member status
When members join they are placed, by default, in the 'Newbie' or 'Members' usergroup.Conversr allows you to choose which secondary usergroups a member is placed in when they join.
Setting of default usergroups allows you to give people permission "by default", but to take it away if they abuse it without having to put them onto a different rank ladder. For example, a 'debates' forum could be created and only the 'Civil Debater' usergroup given access; the 'Civil Debater' usergroup could be a default usergroup, meaning all have access by default – however, members who demonstrated an inability to debate in a civil manner could be removed from it.
It is also possible to give members a choice from a number of primary usergroups when they join. This is especially useful for what I call 'role-based communities', where different members use the website in such a way that is distinct to their role on it. By assigning usergroup according to role, it is possible to use various Composr features in order to customise the site for each role provided.
You'll find all these options on the add/edit usergroup form.
Back-end
Manage usergroups from Admin Zone > Security > Usergroups.You can delete a usergroup from the bottom of its edit form – except you cannot delete certain default usergroups that are used for system functions or as fail-safes.
There is also a module for putting members into usergroups temporarily:
Admin Zone > Security > Temporary usergroup memberships
Front-end, and leadership
Adding a new usergroup
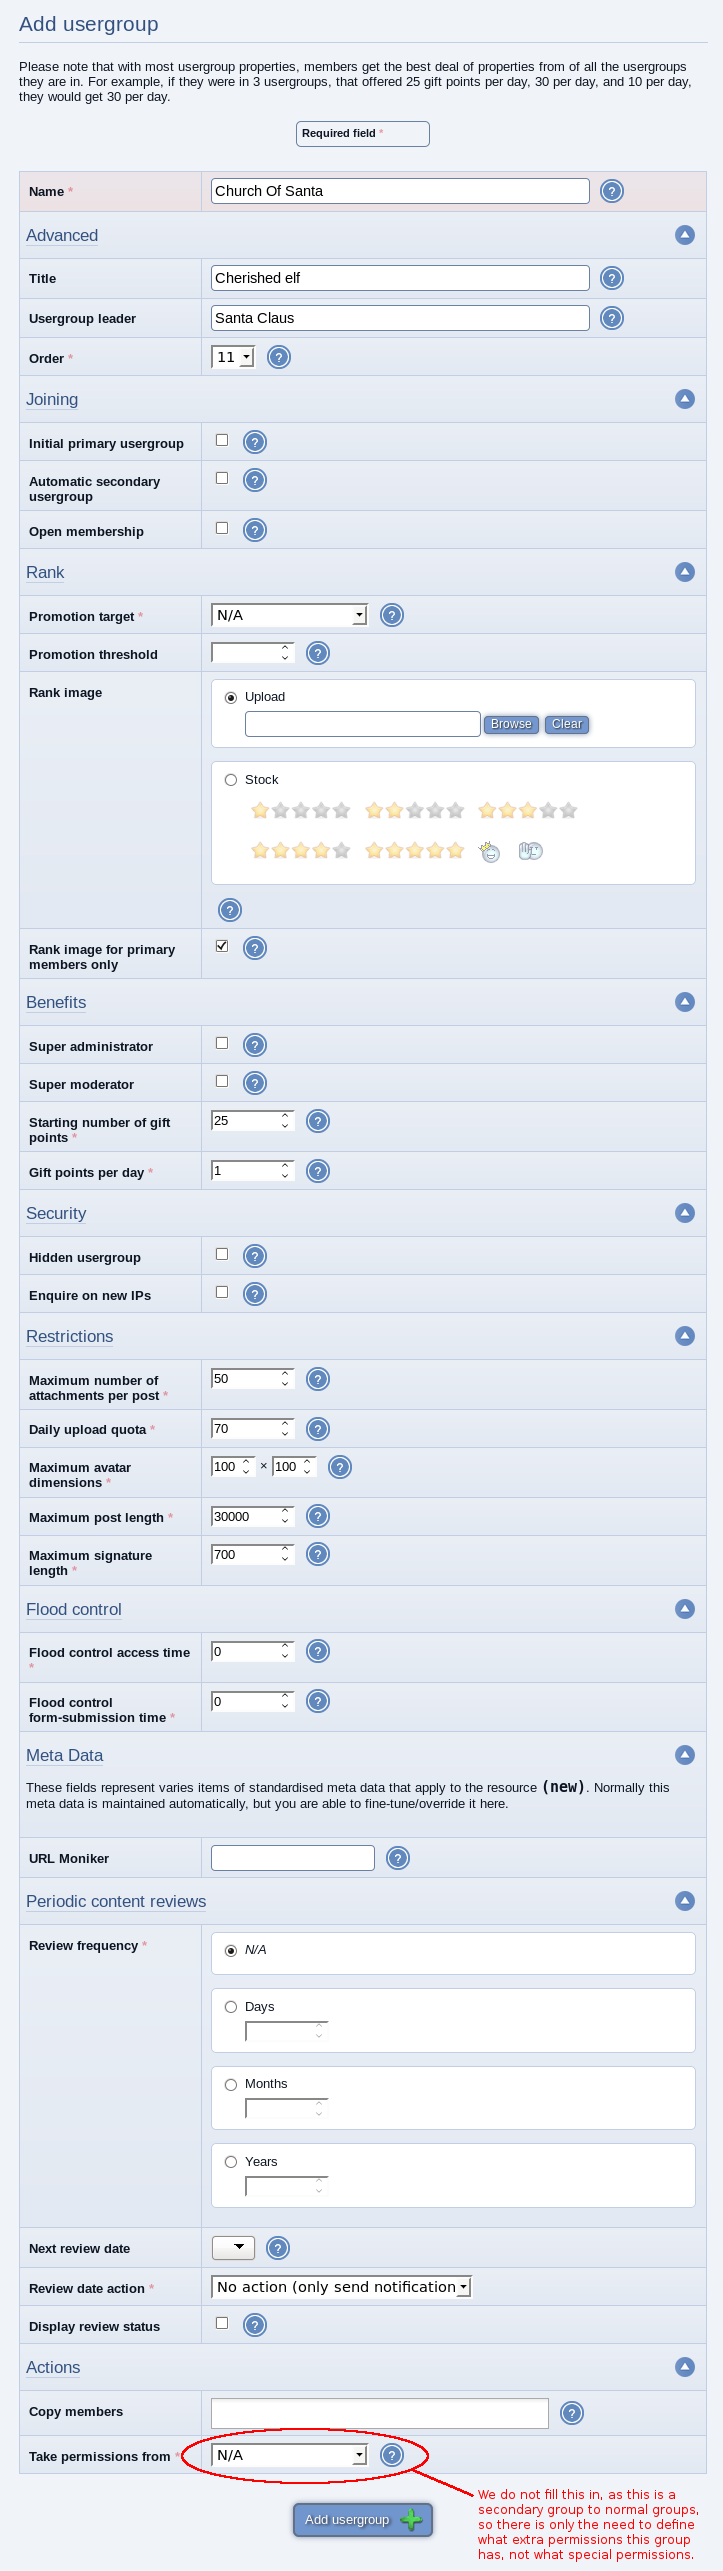
(Click to enlarge)
The usergroup directory

(Click to enlarge)
You may opt to assign a leader to usergroups, or to leave them leaderless. A usergroup leader has the ability to control who is in their usergroup (secondary membership only †), and edit the basic usergroup settings – taking pressure away from the staff. Otherwise, only members with the "Control usergroups that member is not leader of" privilege may add users to usergroups – unless the usergroup involved is a super-administrative usergroup, in which case only a super-administrator may do this (to avoid the potential for privilege escalation).
When a member views a usergroup they have the following possible interactions:
- If they are not already a member:
- If "Open membership") has been enabled:
- Join as secondary
- Otherwise:
- Apply to join as secondary (become a prospective member)
- If "Open membership") has been enabled:
- Otherwise:
- If they are a secondary member:
- Leave
- If they are a secondary member:
- If they have usergroup leadership access:
- Add members as secondary
- Remove secondary members
- Accept prospective members
- Decline prospective members
When a usergroup application is made a notification is dispatched to the leader of the usergroup, or to the staff if there is no leader.
† Only members with the "Assume the identity/access of any other member" privilege may control a member's primary usergroup selection, done by editing their account.
Clubs
The Conversr system provides a clubs feature (Content Management > Clubs). Clubs are a feature written around usergroups. Clubs:- can not have special permissions (they are not shown in permission editing interfaces)
- may be joined and left like ordinary usergroups (via secondary usergroup membership)
- come with their own forum with the same name as the club (privileges to this are automatically assigned when the club and forum are created and cannot be revoked through the Composr permission editing interfaces)
- may be added by ordinary members, depending on how you have configured permissions
The club forum has default permissions that only allow website staff and club members into it. The club functionality provides no special moderation controls – so by default the forum would need to be moderated by the website staff, rather than self-moderated. As it is a regular forum, additional permission changes can be achieved manually (for example, creating a new usergroup for the club's management and assigning moderator permissions over the forum to members of that).
The parent forum and forum grouping for new club forums is configurable.
You can only add a club from the Clubs module. However, once added it can be edited as a usergroup by website staff and converted to a normal usergroup by removing the special "Private club" setting you see when editing it (this is a one-way operation and removes any special club behaviour).
Zones
To finalise the zone, FTP details may be needed so Composr can create the directory structure properly – depending on server architecture
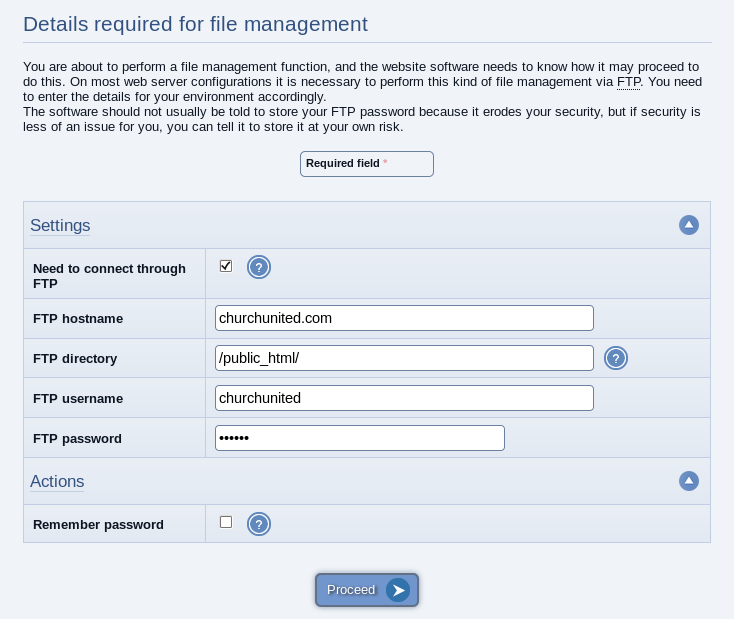
(Click to enlarge)
Adding a new zone for our Church Of Santa subcommunity
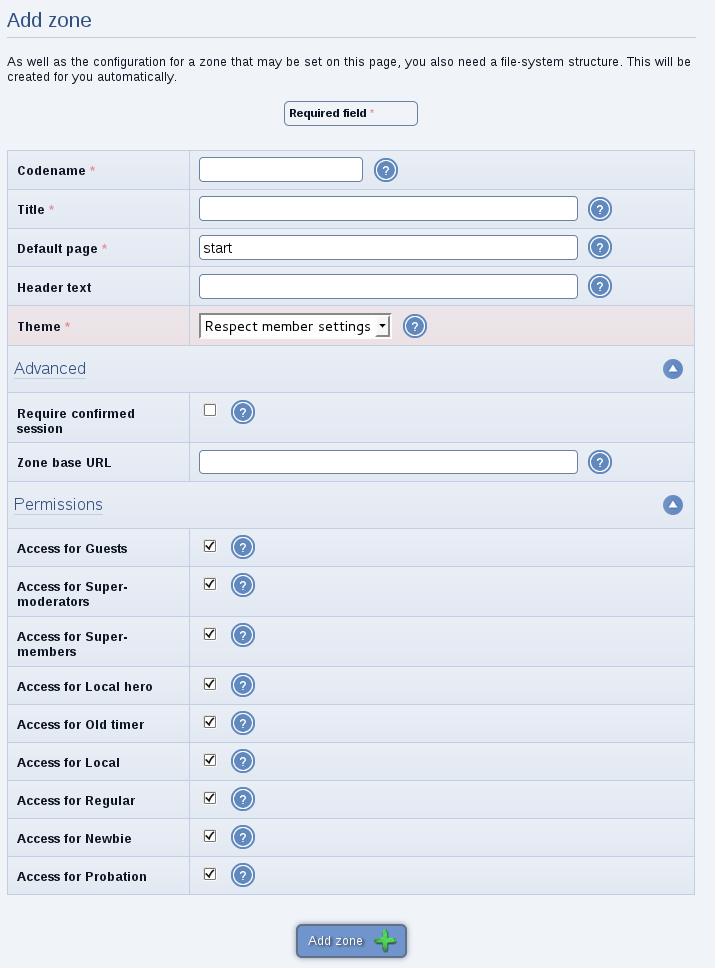
(Click to enlarge)
You may add new zones, edit zones, delete zones, and move pages between zones from:
Admin Zone > Structure > Zones.
You can delete a zone from the bottom of its edit form.
When performing an action that will add, rename or delete a zone, you may need to provide details that tell Composr how it can do this; this is because on the some webhosting configurations, PHP does not have full access to files on the hosting account (lack of suEXEC). These details are the same as you provided when using the Composr quick installer (assuming you used this to install).
Zone logos (advanced)
To change the logo image for a zone, add a theme image named <zone-name>-logo. By default zones use the logo image of the Welcome Zone.Multi-Site-Networks (advanced)
For some sites, it is advantageous to be able to create a whole website for each subcommunity, each with its own settings, yet sharing a single member database and forums. This is possible using a Composr configuration known as a 'multi-site-network' and essentially involves separate Composr installs that are tied together by sharing a forum database. Composr provides special features for multi-site-network sites, and there is separate tutorial on them: as they involve separate installs, most of the features described in this tutorial are not necessary.Advantages to using a multi-site network:
- Full control
- Cleaner administrative separation
- Special multi-site-network features, such as the 'netlink' system
Disadvantages to using a multi-site network:
- Overhead of additional configuration and maintenance
Virtual roots
The virtualised download category
(Click to enlarge)
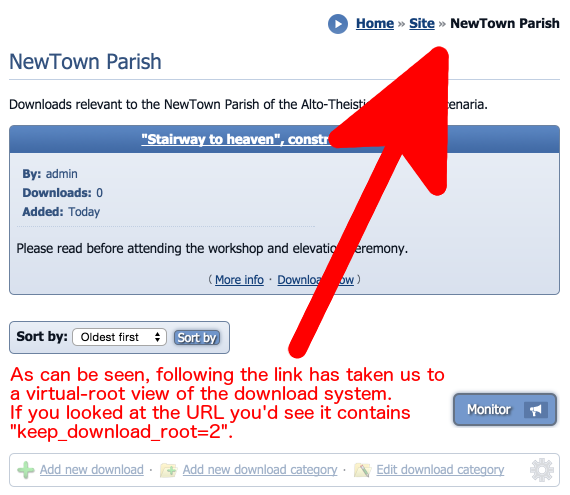
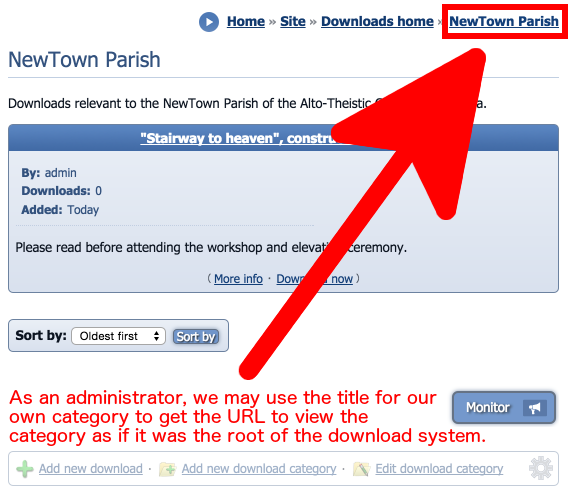
Viewing the download category we added, we can find the virtualisation URL
(Click to enlarge)
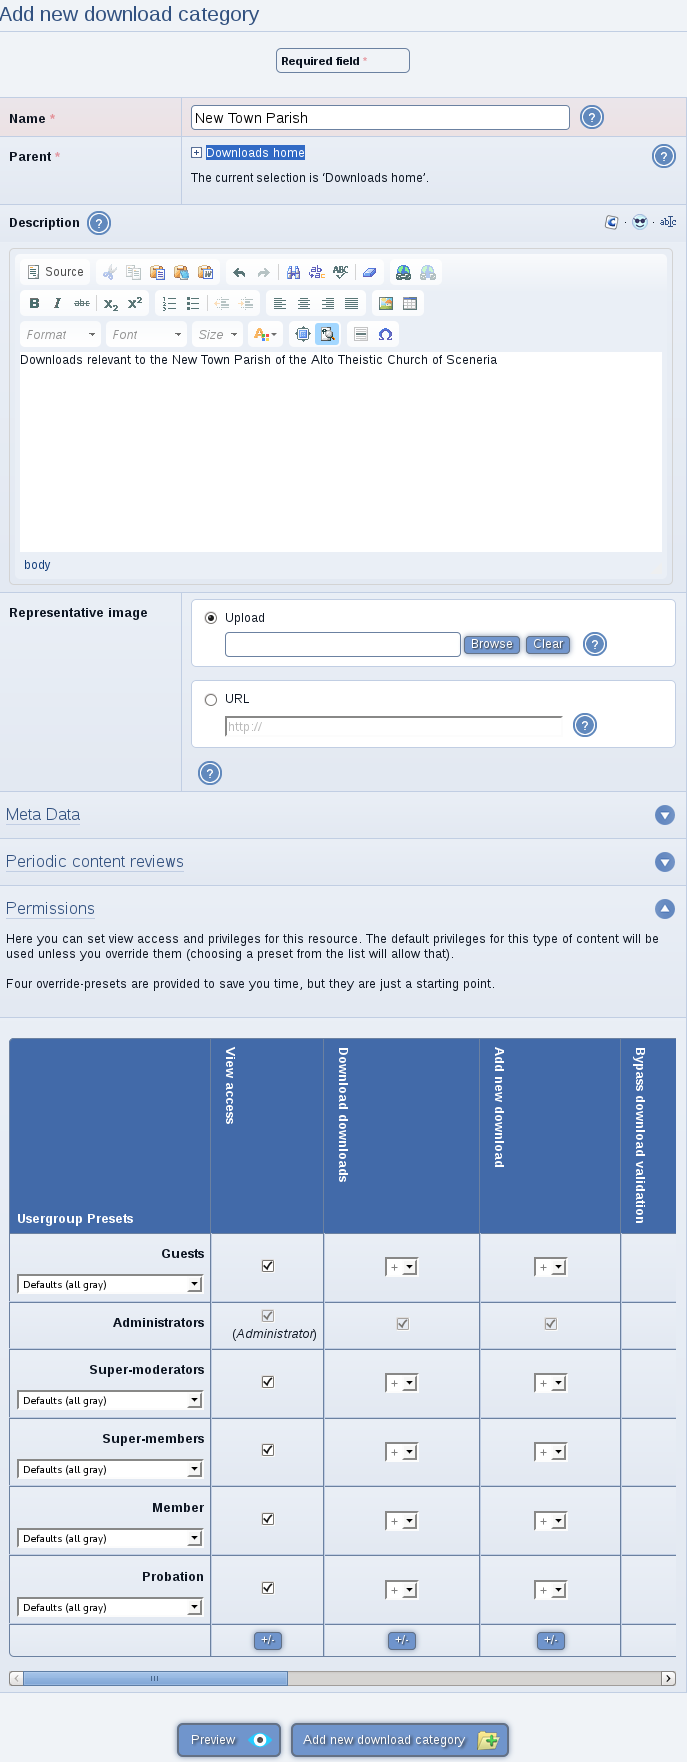
Adding a download category for the NewTown Parish subcommunity
(Click to enlarge)
- galleries
- download categories
- catalogue categories
If subcommunity categories are stored under a common sub-tree of the full category tree, then the root of the 'sub-tree' may be made into the apparent root of the full-tree, by picking it as a virtual-root. This is easy to do, and doesn't involve any kind of configuration other than finding the URL to enter the module with. To find this URL you just look for the link of the current category in the breadcrumbs on a category screen (it'll have something similar to keep_root in it): this is a mouthful to explain, but really very simple. Once you have the URL, you may wish to add it to to the menu of your subcommunities zone.
Here are some step-by-step instructions:
- Browse into the forum you'd like to be the virtual root. You need to be logged in as a staff member when you do this
- Look at the breadcrumbs. You should see the final (rightmost) link in the chain is also a link. This might appear strange, because you're already on the page so why would a link be shown? The reason is that it is an anchor to let you create a virtual root link
- Click the link
- You should see now you have set a virtual root
- Take the URL you're at and put it on your menus as required
Redirects
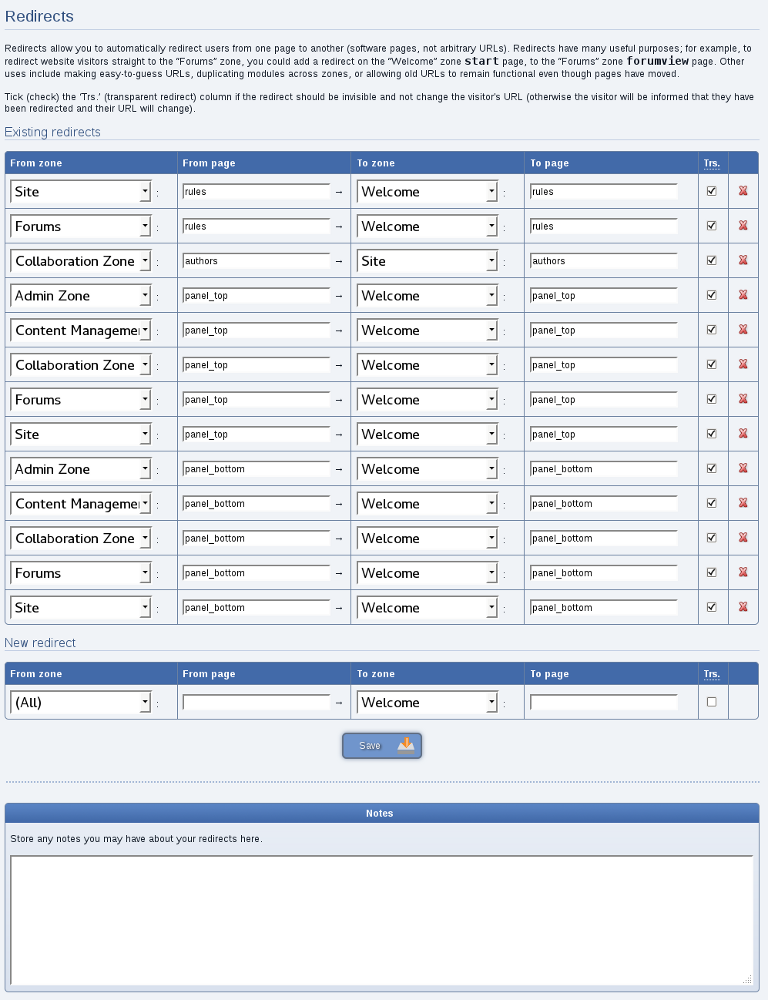
Managing redirects
(Click to enlarge)
Optionally, this redirection may be 'transparent' such that the user doesn't know a redirection is in place, and thus sees the page as if it was in the zone they accessed it from; for security reasons, with a transparent redirection the user still needs permission to view the page as it would be in its original location.
Redirections are useful for a number of reasons, including:
- Sharing modules between zones
- Making short-cuts to zone/page combinations
- Making it so obvious URL mistakes can be automatically corrected
- When moving pages, a redirect may be placed so that links are not broken
To reach the Redirects module go to Admin Zone > Structure > Redirects.
The source page codenames of redirects are case-insensitive. This aligns with the basic sanity check that you shouldn't have pages with names that are the same except for case.
Using redirects to virtually move a module (rename a module)
If you want a module to behave as if it was completely moved, you can set up a transparent redirect from your desired location to the actual location, and then a non-transparent redirect from the actual location to the desired location.Composr will sense your intent, so when you do something that searches for that module (e.g. for the Wiki+ module, doing a Wiki+ link) it will go to where you want.
Example: Changing your front page to a module in another zone
Adding our redirect

(Click to enlarge)
A normal redirect can be written from the "Welcome" zone start page, to the "Forums" zone forumview page as follows…
- Go to Admin Zone > Structure > Redirects
- Scroll towards the bottom of the page to find the "New Redirect" section
- Create our new redirect as "Welcome:start → Forums:forumview" (leave transparent unticked/unchecked)
- Press the "Save" button
Now let's test if our new redirect works…
Go back to your home page. If you entered all the details correctly you should now see that you are immediately redirected to the "Forums" page instead of the "Home" page. Look closely at the URL in your browser's address bar, you should see this forumview in there. This tells you the redirect took you to where you expected. There is a visible URL change as this was a normal redirect rather than a transparent redirect.
Now let's try the same for a transparent redirect and see the results. To make our redirect transparent we need to go back to edit the redirects and tick (check) the "Trs." field. Go do that and press the "Save" button.
When you visit the home page you are redirected to the Forums page just like earlier with the normal redirect, but take a look at the URL now: it doesn't reveal that the forumview page was called. The redirect happened within Composr, not your web browser.
Example: Moving a module (renaming a module)
If you wanted to move the supermembers module from the Collaboration Zone to the Site zone (with a new module name), you could set up these redirects:- site:super→collaboration:supermembers transparent
- collaboration:supermembers→site:super non-transparent
Note that while almost all front-end modules support moving, not all modules support renaming because it may break references between different parts of Composr (including within the module itself in some cases).
Example: Moving multiple modules
Our redirects
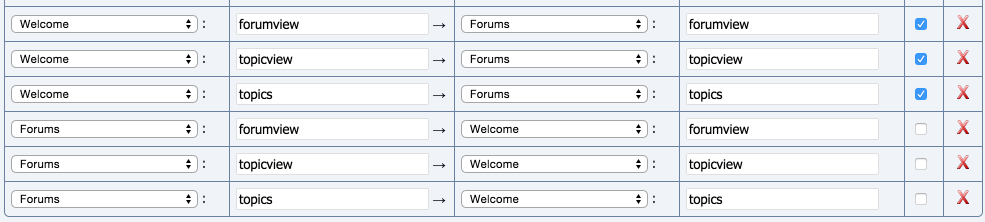
(Click to enlarge)
We can make the forum modules available in the welcome zone by setting up these transparent redirects…
:forumview → forum:forumview transparent
:topicview → forum:topicview transparent
:topics → forum:topics transparent
And then we set up non-transparent redirects in the opposite direction to force links to the forum to open up in the welcome zone…
forum:forumview → :forumview non-transparent
forum:topicview → :topicview non-transparent
forum:topics → :topics non-transparent
Tada, all the forum modules are moved.
Example: Making a module run in multiple zones (advanced)
Let's imagine you want separate download databases in separate zones. In this example we'll have a separate database in a staff zone using a series of tricks.If you want to follow this example you'll need to create the staff zone first.
Our first trick is to add our redirect:
staff:downloads → site:downloads transparent
Now we have the downloads module running from the staff zone. However, it shares the same downloads. The next trick to solve this is to deep link to the base category for our zone (from our menu link, or whatever navigation we are going to use for our zone). Let's imagine you have a download category called "Staff files" with ID#5, and want this as the root category in your staff zone – so you'd link to that.
Obviously the above is not much of a trick because it allows users to then navigate up via the breadcrumbs. Fortunately we have another trick to adjust the breadcrumbs…
You need to edit the breadcrumbs XML file (documented in the Composr site structure tutorial) through "Admin Zone > Structure > Breadcrumb Overrides" so that site:downloads:browse:5 maps straight back to the staff zone front page. Do this by adding in a new substitution rule:
Code (XML)
<substitution match_key="site:downloads:browse:5">
<link label="Staff">staff:</link>
</substitution>
<link label="Staff">staff:</link>
</substitution>
And there we go
 !
!An alternative to using the breadcrumbs XML file would have been to use virtual roots. Composr is packed with power-tools you can use!
Concepts
- Virtual root
- Virtual roots allow you to split a Composr tree based content system (such as the download system) so it appears to have multiple databases
- Redirection page
- Allows pages to be redirected to from different zone/page combinations, either transparently, or with a redirection message
- Club
- A special usergroup with no permissions that comes with its own forum
See also
Feedback
Please rate this tutorial:

Have a suggestion? Report an issue on the tracker.