
Composr Supplementary: Catalogues in Composr
Written by ocProducts
If you want to create your own mini-database, a Composr catalogue will allow you to do it.This document contains a series of tutorials stepping you through creation of sophisticated catalogues in Composr.
Table of contents
Creating a new catalogue and entries
Step1:Use the admin username and password to login, and navigate to the admin zone of your Composr website. Navigate to the 'Content' dropdown menu and select 'Catalogues'.
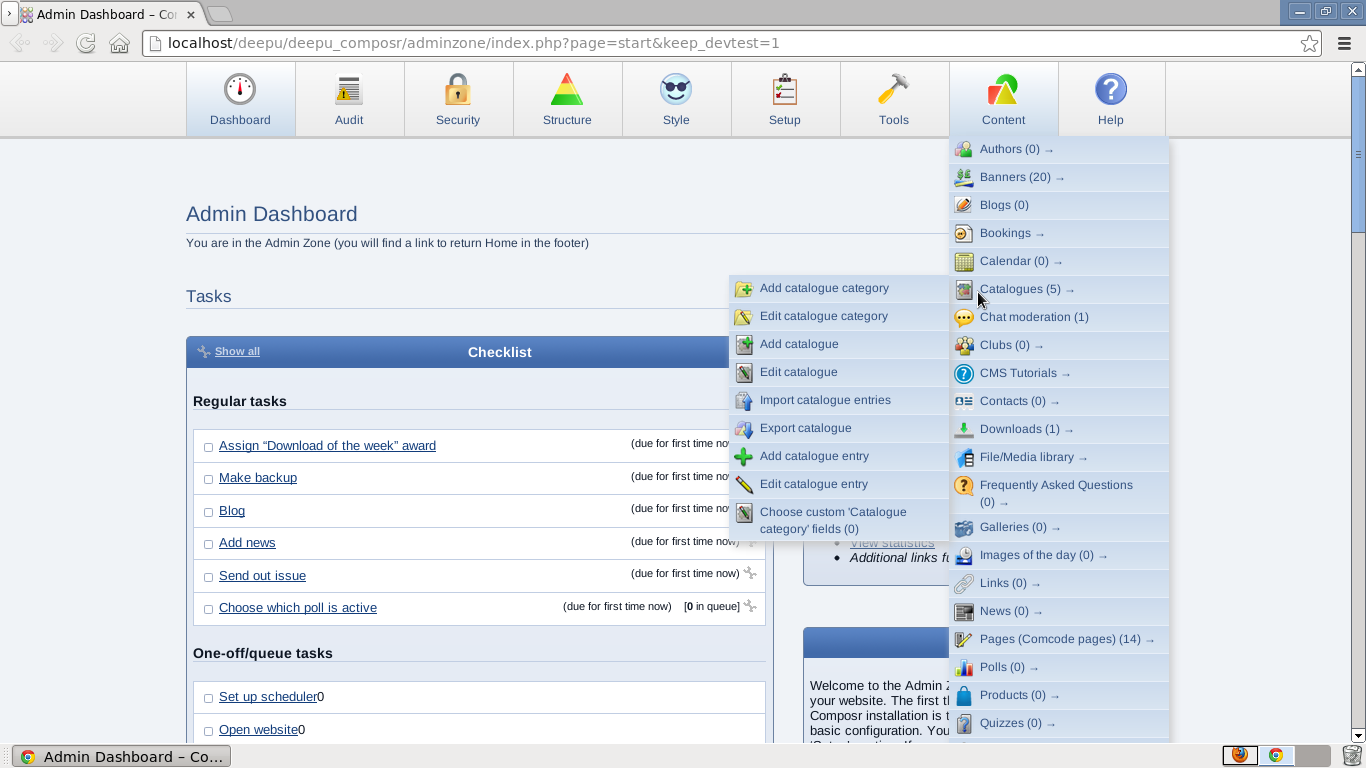
(Click to enlarge)
Step2:
From the Manage Catalogues window, select 'Add catalogue' option to create a new catalogue.
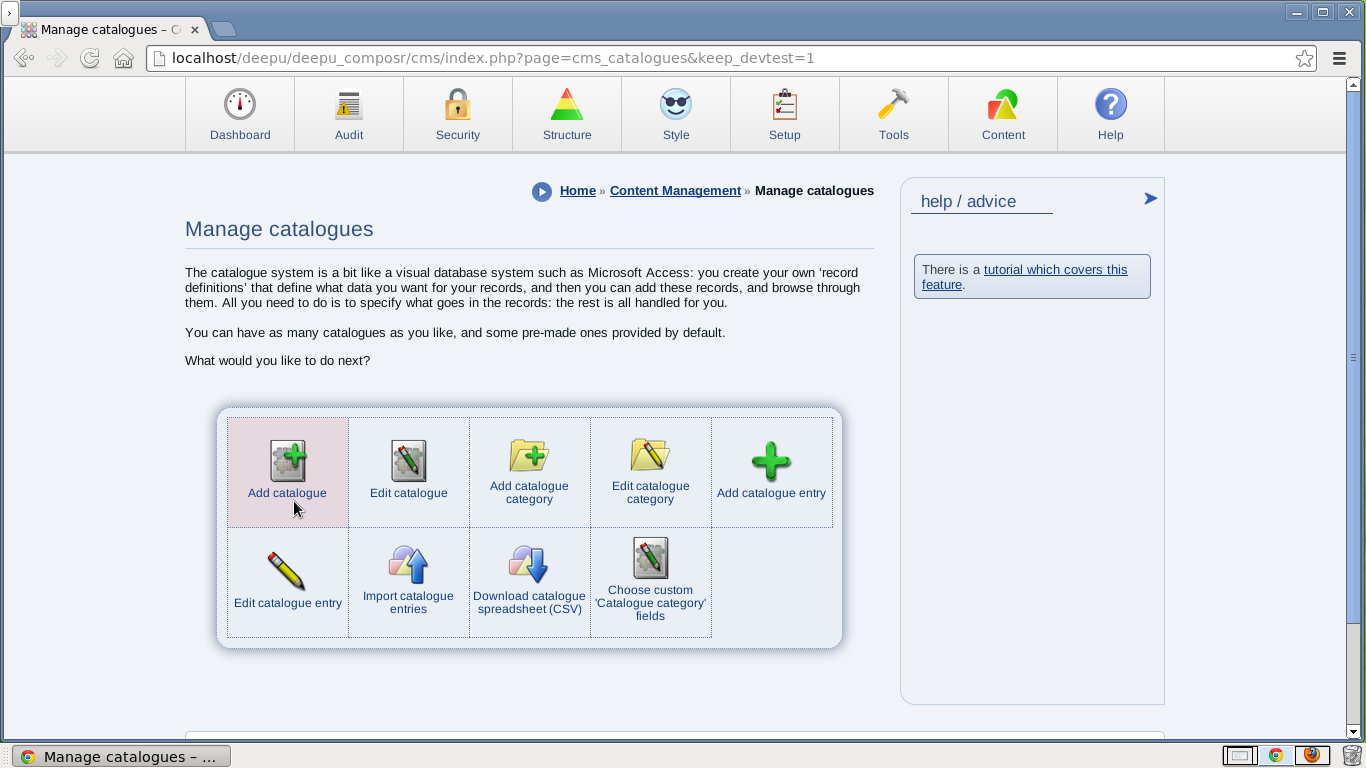
(Click to enlarge)
Step3:
In the 'Add catalogue' window, fill all the necessary fields.
Let's create a catalogue for holding entries for different cars. To create a new catalogue named cars, the Title, Codename and Description can be filled as shown in the screen shot. Leave the remaining options as default. This includes leaving the display type as 'Field-maps', which is the best choice if we're going to customise the layout (described in subsequent tutorials).
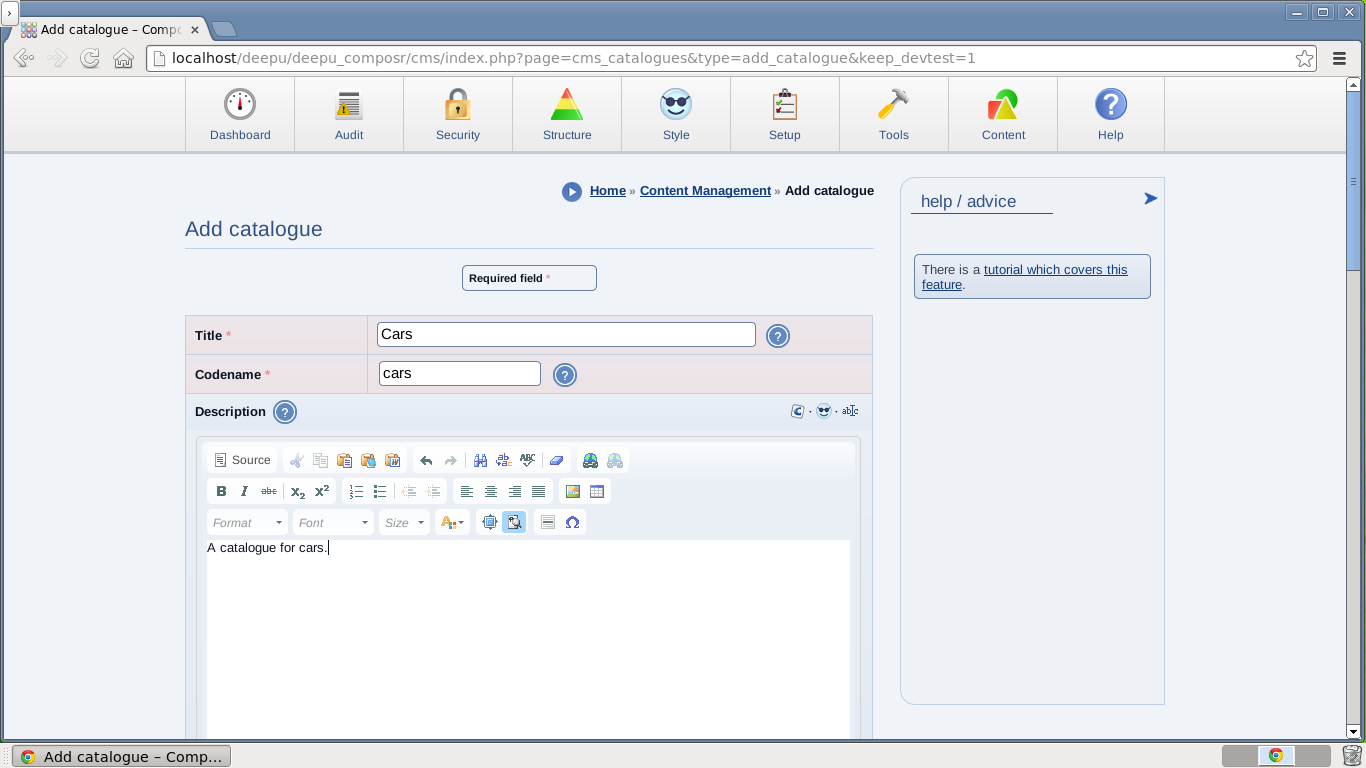
(Click to enlarge)
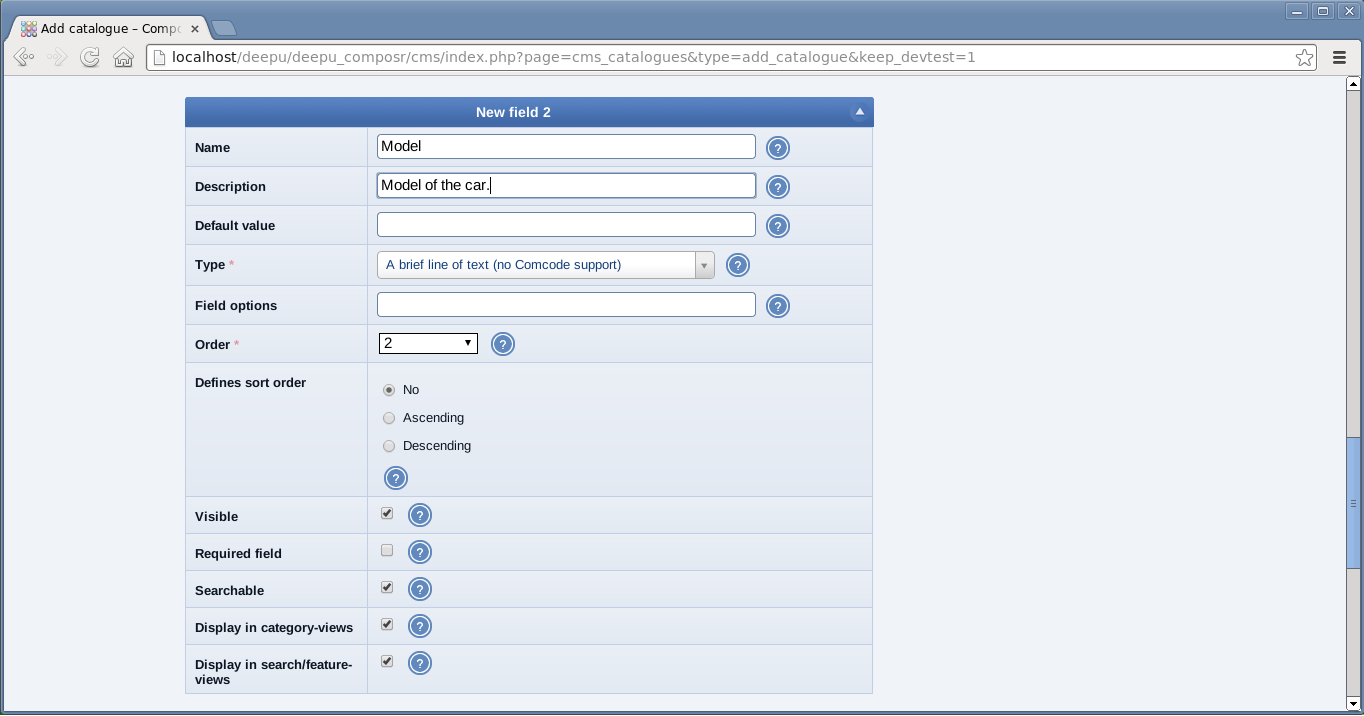
Step4:
In the 'Add new fields to this catalogue' section, add the details of each new field.
In this example, the name of the first field is set to 'Make' with a description 'Make of the car'. The field type is set to 'A brief line of text'. Leave the rest of the options as default.

(Click to enlarge)
Similarly add two more fields for 'Model' and 'Engine Capacity'.
(Click to enlarge)

(Click to enlarge)
The fourth field can be used to upload a picture of the car. For this set the Field type to 'An uploaded picture'.
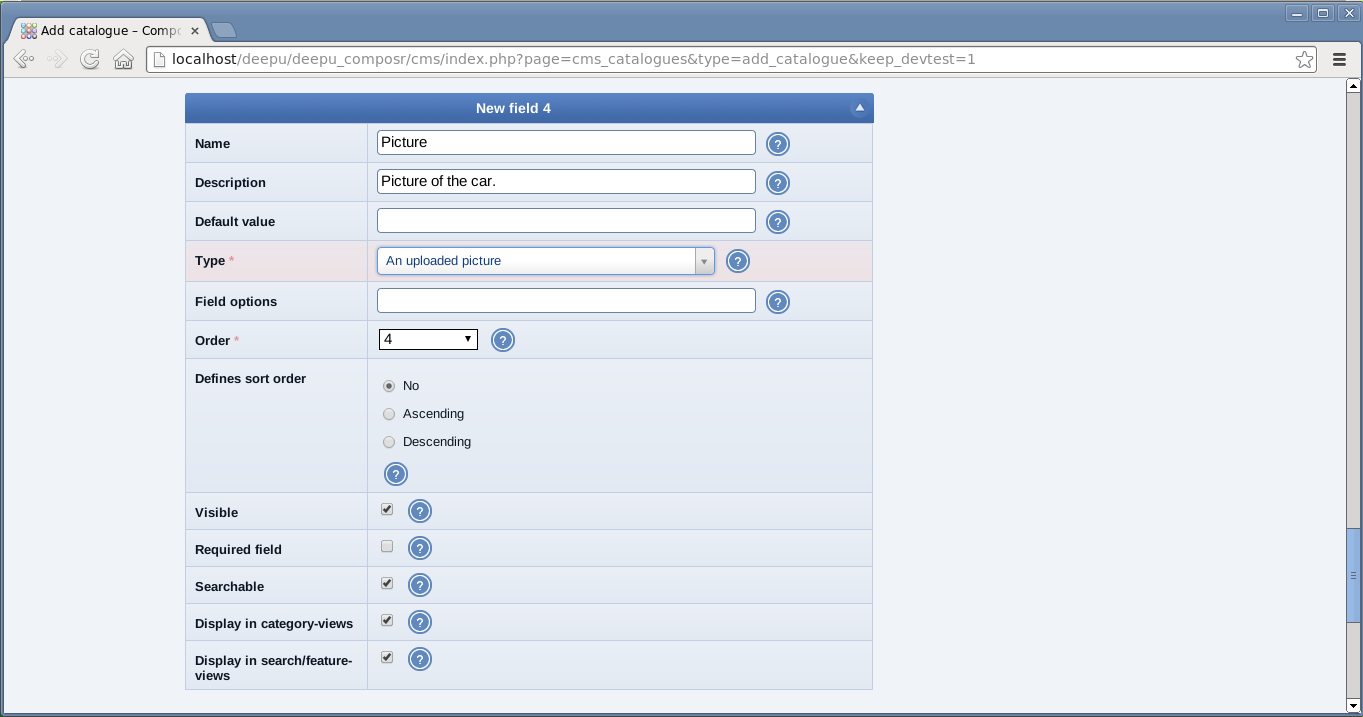
(Click to enlarge)
Submit the form by clicking the 'Add catalogue' button at the bottom of the form.
Step5:
After creating a catalogue successfully, you can add entries to it.
Click on the 'Add an entry' button to proceed to do this.

(Click to enlarge)
Step6:
Fill all the details as required in the 'Add a Cars entry' form. Also choose a picture to upload for the entry.
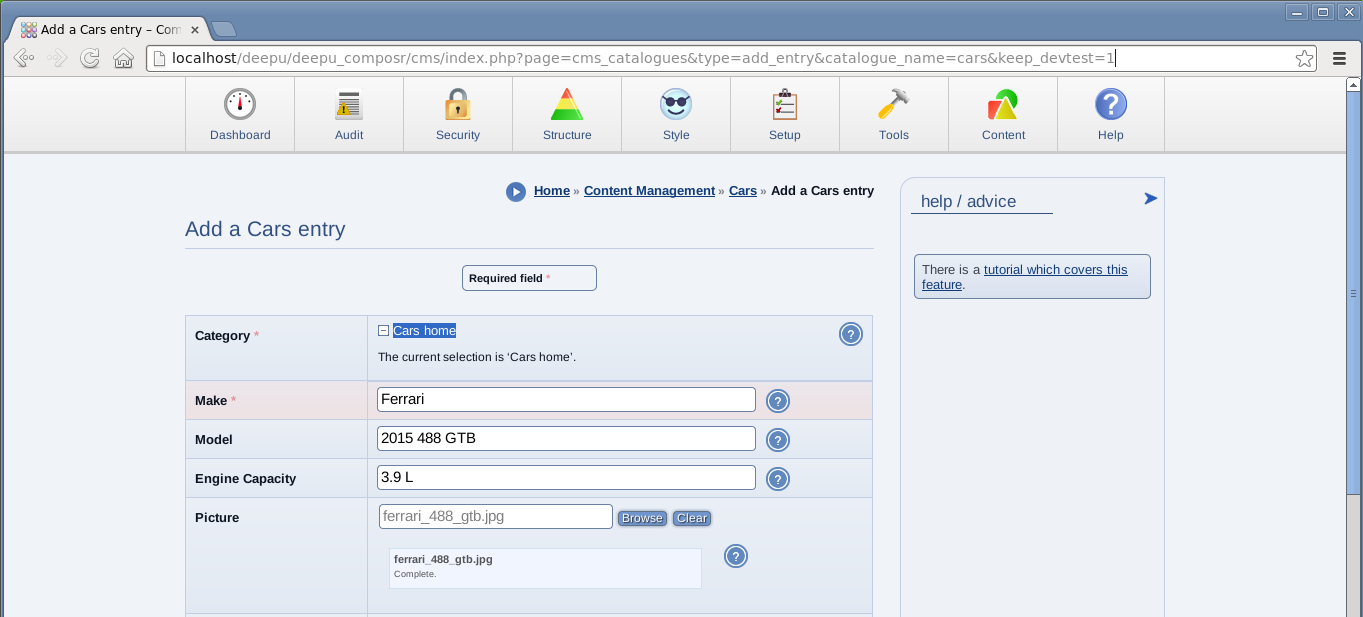
(Click to enlarge)
You may notice there is only one category to choose from (using the term 'choose' loosely). We could have added more categories, but for the purpose of these tutorials, we'll just assume everything is in the same category. Having multiple categories doesn't really complicate things for you, it would just mean you'd need to make sure you navigated to the right category when testing.
Repeat step5 and step6 to add more entries to the catalogue.
Step7:
To view the catalogue entry, navigate to the Catalogue name from the content menu. You will be able to see a screen similar to the one show in the screen shot below.
If you already customised your panels or menus (perhaps via the Setup Wizard), you may not see a direct link – but you may see a link to 'Catalogues' and then a link to your catalogue from that page. You can add a direct link onto your menus manually from the menu editor.
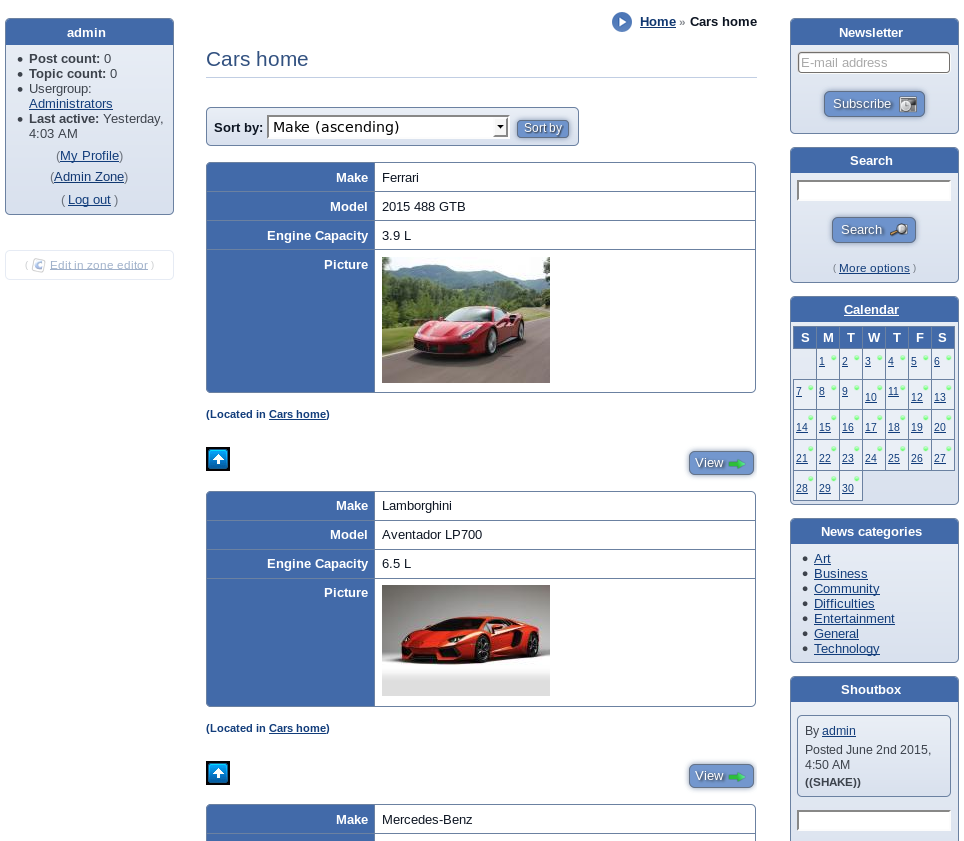
(Click to enlarge)
Embedding a catalogue into a page
If you want to display the contents of a catalogue category within another page, you can embed it on there as a block. This is useful if you are trying to embed a database listing within a wider context (e.g. in the middle of an article), or if the listing is just not something you want people to have to separately navigate to).If you are using multiple categories, you'll probably not want to embed, as it is difficult to get category navigation working within an embedding scenario. The normal catalogues module (which is what you've already been using to display entries up to this point) is designed to handle all this kind of thing well, so it's best to make use of that.
This tutorial explains how to do embedding.
Step1:
Log in to the Composr site using the admin username and password. Then navigate to the Comcode Page where you want to embed the catalogue block. Click on the 'Edit this page' link at the bottom of the page. If you haven't created the page yet, create it (Admin Zone → Structure → Add-New-Page Wizard), which will put you into the editing screen also.
Step2:
The catalogue block can be embedded using the main_cc_embed block. You can manually embed catalogue by pasting the below line of code in the appropriate place in the Comcode editor.
Code
[block="8" max="30"]main_cc_embed[/block]
Here '8' stands for the catalogue category ID and '30' stands for the maximum number of results to be included. You can find the IDs by looking at the IDs used in the URL when you go to edit a category. However…
The 'Add block' tool in the Comcode editor can be used to make this process easier. It will let you pick out the ID visually instead. Select the 'Add block' button from above the Comcode text editing box. In the overlay that opens, scroll down to the Catalogues section.

(Click to enlarge)
Select the 'Catalogue category embedding' subheading to bring up the Block construction assistant settings for the main_cc_embed block.
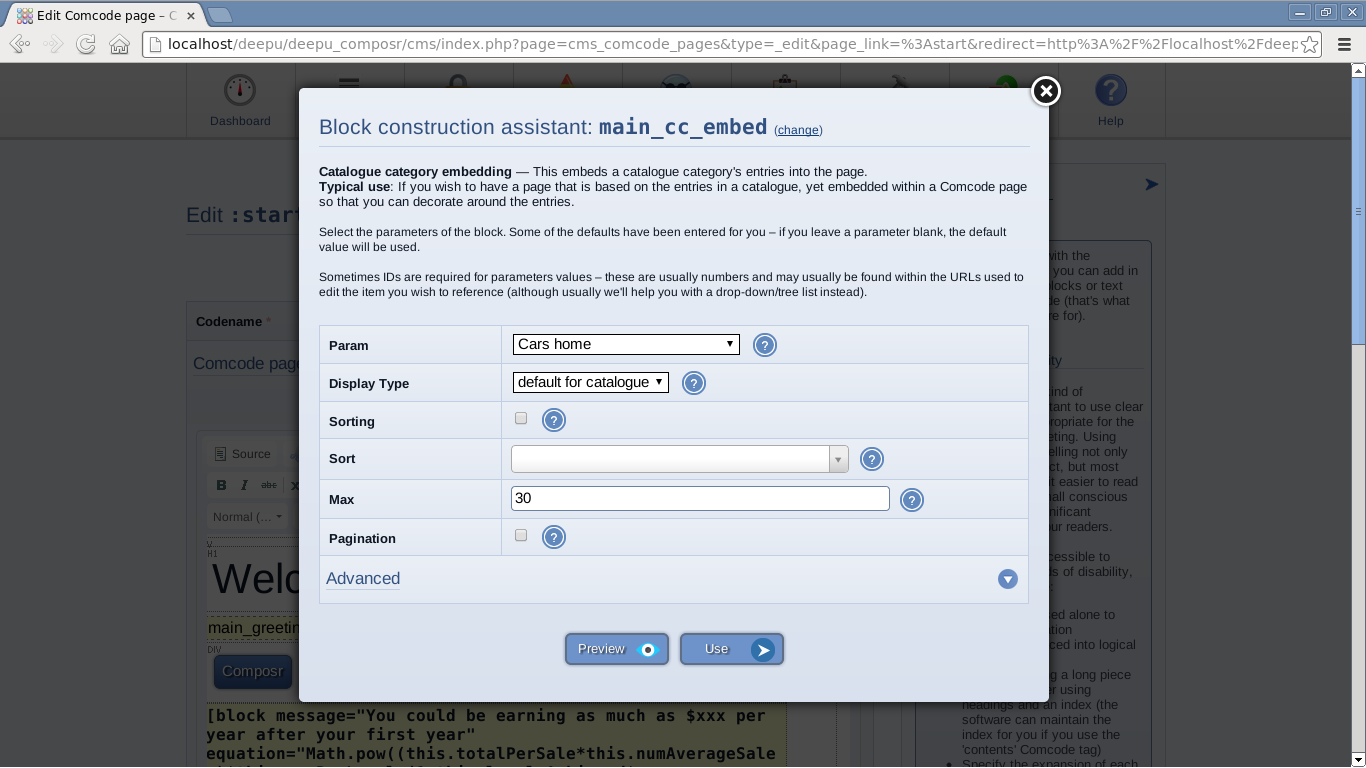
(Click to enlarge)
Fill in the required details and select the 'Use' button. The Comcode for embedding the catalogue similar to the above code will be added to the Comcode editor.
The changes can be saved if you are done (click the 'Save' button at the bottom of your open Comcode page editing screen).
You will see the catalogue block has been embedded, like in the following screen shot.

(Click to enlarge)
Customising catalogue layout
Advanced users will wish to customise the layout of their catalogue entries. This is a moderately advanced task, requiring you have some knowledge of HTML and willingness to learn some of Composr's syntax.Step1:
To modify the default template of the catalogue, the default template files can be overridden by creating custom templates for your catalogue.
For modifying the template for the cars catalogue, make copies of the following files in the themes/default/templates/ directory on your server, named as follows:
CATALOGUE_DEFAULT_CATEGORY_SCREEN.tpl → CATALOGUE_cars_CATEGORY_SCREEN.tpl
CATALOGUE_DEFAULT_CATEGORY_EMBED.tpl → CATALOGUE_cars_CATEGORY_EMBED.tpl
CATALOGUE_DEFAULT_FIELDMAP_ENTRY_WRAP.tpl → CATALOGUE_cars_FIELDMAP_ENTRY_WRAP.tpl
(save the copies back into themes/default/templates/ on the server, i.e. alongside the original files)
The CATALOGUE_cars_FIELDMAP_ENTRY_WRAP.tpl file contains the template for displaying the individual catalogue entries within a category.
The CATALOGUE_cars_CATEGORY_EMBED.tpl file contains the template that binds all the catalogue entries together if you're displaying via embedding (the main_cc_embed block). The CATALOGUE_cars_CATEGORY_SCREEN.tpl file contains the template that binds all the catalogue entries together if you're displaying via the catalogues module (i.e. not embedded).
Step2:
In Composr, make sure you have the category listing open. If you are viewing via embedding, go to the page you embedded on. Otherwise, go to the default category listing for the cars catalogue.
Step3:
Open the CATALOGUE_cars_FIELDMAP_ENTRY_WRAP.tpl file in your text editor (or the Composr template editor if you prefer) and remove all the code in it.
You will write your custom design for individual catalogue entry in this file.
Your first edit will be counter-intuitive, but is incredibly useful. Paste the below code in this file:
Code
{+START,PARAM_INFO}{+END}
Save the file and refresh the web page you opened in Step2. You'll see a table of all the available parameters to the template. These will be used for referencing the fields of the content you've added, among other things.
Step4:
From the parameter table you can see that the individual fields in the catalogue entry can be accessed using Tempcode parameters like {FIELD_0}, {FIELD_1}, etc.
In our example, the field entries are mapped as follows:
{FIELD_0} → Make
{FIELD_1} → Model
{FIELD_2} → Engine Capacity
{FIELD_3} → Picture
{VIEW_URL} => Gives the URL to the page for the catalogue entry.
(in fact, you will see there are various variations you can choose from, including a way to get at the picture field's raw image URL.)
Clear the contents of CATALOGUE_cars_FIELDMAP_ENTRY_WRAP.tpl file again, so we can write in something proper this time. Paste the below code, which we've prepared as an example:
Code (HTML)
<div class="box" style="width:220px;float:left;margin:10px;">
<div class="box_inner">
<div style="text-align:center;">
<h2><a href="{VIEW_URL*}">{FIELD_0}</a></h2>
</div>
<div style="width:200px;height:110px;overflow:hidden;">{FIELD_3}</div>
<div>
<ul>
<li>{FIELD_1}</li>
<li>{FIELD_2}</li>
</ul>
</div>
</div>
</div>
<div class="box_inner">
<div style="text-align:center;">
<h2><a href="{VIEW_URL*}">{FIELD_0}</a></h2>
</div>
<div style="width:200px;height:110px;overflow:hidden;">{FIELD_3}</div>
<div>
<ul>
<li>{FIELD_1}</li>
<li>{FIELD_2}</li>
</ul>
</div>
</div>
</div>
You may wonder why some parameters are given a '*' on the end. This is because these parameters aren't yet formatted for HTML, they're plain text. The '*' tells Composr to format them for HTML, which means replacing & with &, > with > and other such things. It is important for security. The {FIELD_<number>} parameters are already formatted for HTML, as these hold already-displayed field values, not raw plain text values (e.g. {FIELD_3} holds the HTML to show the picture, not the raw picture URL).
Step5:
Pick the appropriate instructions below, depending on your scenario:
(if you're using main_cc_embed to display the category):
Open the file CATALOGUE_cars_CATEGORY_EMBED.tpl in your text editor and clear its contents. Paste the below code to create the new template for the embed block:
Here,
{CATALOGUE} gives the name of the catalogue, and,
{ENTRIES} gives all the field map entries generated in step4's template.
(if you're using the catalogues module to display the category):
Open the file CATALOGUE_cars_CATEGORY_SCREEN.tpl in your text editor and clear its contents. Paste the below code to create the new template for the category screen:
Here,
{TITLE} gives the normal title for the category viewing screen, and,
{ENTRIES} gives all the field map entries generated in step4's template.
Step6:
Save both the files and refresh the web page. You will get a screen similar to the one shown in the screen shot below.

(Click to enlarge)
Naturally, you will want to do a more sophisticated layout to match your own particular needs. This tutorial has given you the tools to insert Composr's data (well, your data) into whatever wonderful HTML and CSS you care to write.
Step7:
If you wish to write your own CSS, it's best to place it in the catalogues.css CSS file (saved as themes/default/css_custom/catalogues.css).
When we wrote our example CATALOGUE_cars_FIELDMAP_ENTRY_WRAP.tpl file, we were quite sloppy. We used a lot of inline CSS. We could rewrite the template as follows:
And put this into our catalogues.css file (at the start or end, don't erase the rest of the file):
Code (CSS)
.car_catalogue .box {
width: 220px;
float: left;
margin: 10px;
}
.car_catalogue .box>h2 {
text-align: center;
}
.car_catalogue .box .box_inner {
width: 200px;
height: 110px;
overflow: hidden;
}
width: 220px;
float: left;
margin: 10px;
}
.car_catalogue .box>h2 {
text-align: center;
}
.car_catalogue .box .box_inner {
width: 200px;
height: 110px;
overflow: hidden;
}
Further customisation of catalogue layout
Customising the catalogue entry viewing screen
Step1:So far we've redesigned catalogue categories, but we haven't touched the screen for viewing entries yet.
The default catalogue entry viewing screen contains a section for entering comments. As an example, let's remove that.
Make a copy of the template file CATALOGUE_DEFAULT_ENTRY_SCREEN.tpl and save it as CATALOGUE_cars_ENTRY_SCREEN.tpl.
Search for the following code and remove it from the file:
Save the file and refresh the web page to view the result.
Step2:
Generally, editing the CATALOGUE_DEFAULT_ENTRY_SCREEN.tpl template is the same as editing the CATALOGUE_DEFAULT_FIELDMAP_ENTRY_WRAP.tpl template; that said, CATALOGUE_DEFAULT_ENTRY_SCREEN.tpl has a few more parameters to work with as the full screen has more capability than just one entry shown among many has.
Creating photo URL field and showing it using <img /> tag
Step1:To display the image using your own customised <img /> tag, the corresponding template file has to be modified suitably. Open the template file CATALOGUE_cars_FIELDMAP_ENTRY_WRAP.tpl in your text editor.
Replace {FIELD_3} with the following this line of code
Code (HTML)
<img src="{$THUMBNAIL*,{FIELD_3_PLAIN},150}" alt="{$STRIP_TAGS,{FIELD_1}}" />
Now the contents of the CATALOGUE_cars_FIELDMAP_ENTRY_WRAP.tpl file would look something like:
Code (HTML)
<div class="box" style="width:220px;float:left;margin:10px;">
<div class="box_inner">
<div style="text-align:center;"><h2><a href="{VIEW_URL}">{FIELD_0}</a></h2></div>
<div style="width:200px;height:110px;overflow:hidden;">
<img src="{$THUMBNAIL,{FIELD_3_PLAIN},150}" alt="{$STRIP_TAGS,{FIELD_1}}" />
</div>
<div>
<ul>
<li>{FIELD_1}</li>
<li>{FIELD_2}</li>
</ul>
</div>
</div>
</div>
You should see that you have your own custom thumbnail of 150 pixel width. This was generated by {$THUMBNAIL,...,...} which is a very useful Tempcode construct.
We put the 'Make' field in as the alt text of the image. You may wonder what {$STRIP_TAGS,...} is for. This is required just in case there are any HTML tags within the Make. We can't show HTML tags within an HTML attribute, so we need to strip them out.
See also
Feedback
Please rate this tutorial:

Have a suggestion? Report an issue on the tracker.