
Composr Supplementary: Adding Banners to Your Composr Website
Written by Steve Jarvis, Sponsored by Arvixe hosting
Banners make up a key part of many websites and Composr has a banner system which allows you to display a number of banners in any of your site panels, regular pages, or templates.In this tutorial we will cover adding to a page (or panel – which is a kind of page), not templates. We will do it using the main_banner_wave block, which displays all banners added within a banner type as one continual set.
This is a three step process to be able to add banners to your site which includes creating a banner type, adding a banner and then attaching the banners to your page.
Creating a banner type
Add Composr banner type
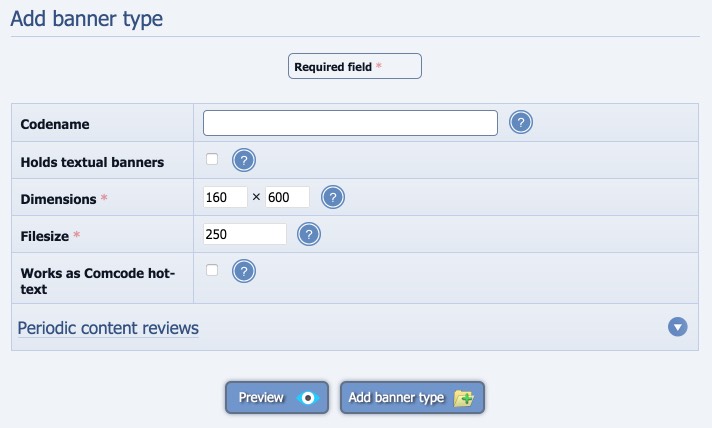
(Click to enlarge)
- Go to the Admin Zone
- Navigation to the Content section of the Admin Zone menu
- Choose the Banners icon
- Choose the Add banner type icon
- Once you get to the banner type form you need to fill in the form which includes:
- Giving the banner type a name
- Choose whether the banner will be text style or not
- Give the banner type a height and width
- Choose the max file size the banners can have. This is important as large files can cause your site to run slowly
Uploading a banner to your new type
Adding a banner in Composr
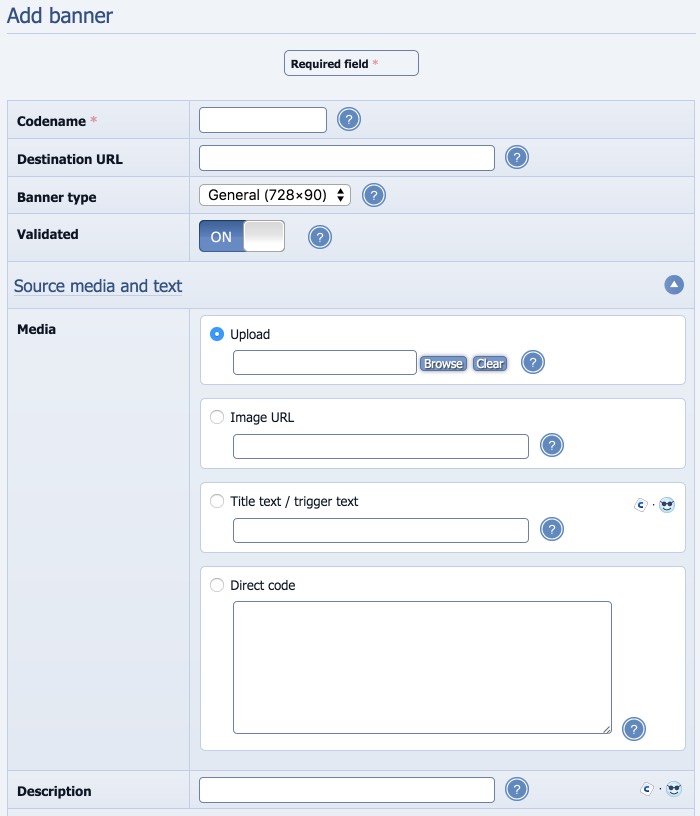
(Click to enlarge)
- Go to Admin Zone > Content > Banners > Add banner
- Give your new banner a name
- Choose where the banner will link to when clicked
- Choose the banner type the banner will fit in to from the drop down
The next section goes through the process of uploading the banner image and the options for if you are using a banner image which is already uploaded elsewhere. There is a box for trigger text if you have enabled this when you added your banner type. There is also a box for HTML/PHP if you have external banner code which you want to display.
The final section deals with what type the banner is. You can choose whether the banner is a permanent banner which will stay live all the time and you can also choose whether the banner is a campaign banner or a default fall back banner if there are no others to display.
The courtesy hits option is how many times the banner can be clicked before it is withdrawn from being used. You can also choose how important the banner is, so when you have a lot of banners this determines how often it will randomly appear. If you only have a few banners they will display more often.
The last option is the expiry date for a banner which will only display until this date. This is useful for campaigns which only last a certain amount of time. You can now click add banner. You will need to repeat the process as many times as you have banners to upload before moving on to displaying the banners on the site.
Adding the new banners to your site
Viewing the banners
(Click to enlarge)
- Navigate to the zone where you want the banners to appear
- Click the edit link for the panel where you want the banners to appear on for example the left panel (or it its a regular page, edit that page)
- Open the Block construction assistant (the red box icon) and scroll down to the Banner wave block and select it
- Choose the banner type you want to display
- Choose the maximum number of banners you want to display. This is set to 100 which will be very long. If you set this number lower than the number of banners you have uploaded it will randomly display the banners based on how important you set them in the previous process.
- Click Use and then save the panel (or page) you have edited.
Feedback
Please rate this tutorial:

Have a suggestion? Report an issue on the tracker.